Creating the original 1966 Olds Cutlass version in 1/25 scale.
By Scott Kapellusch
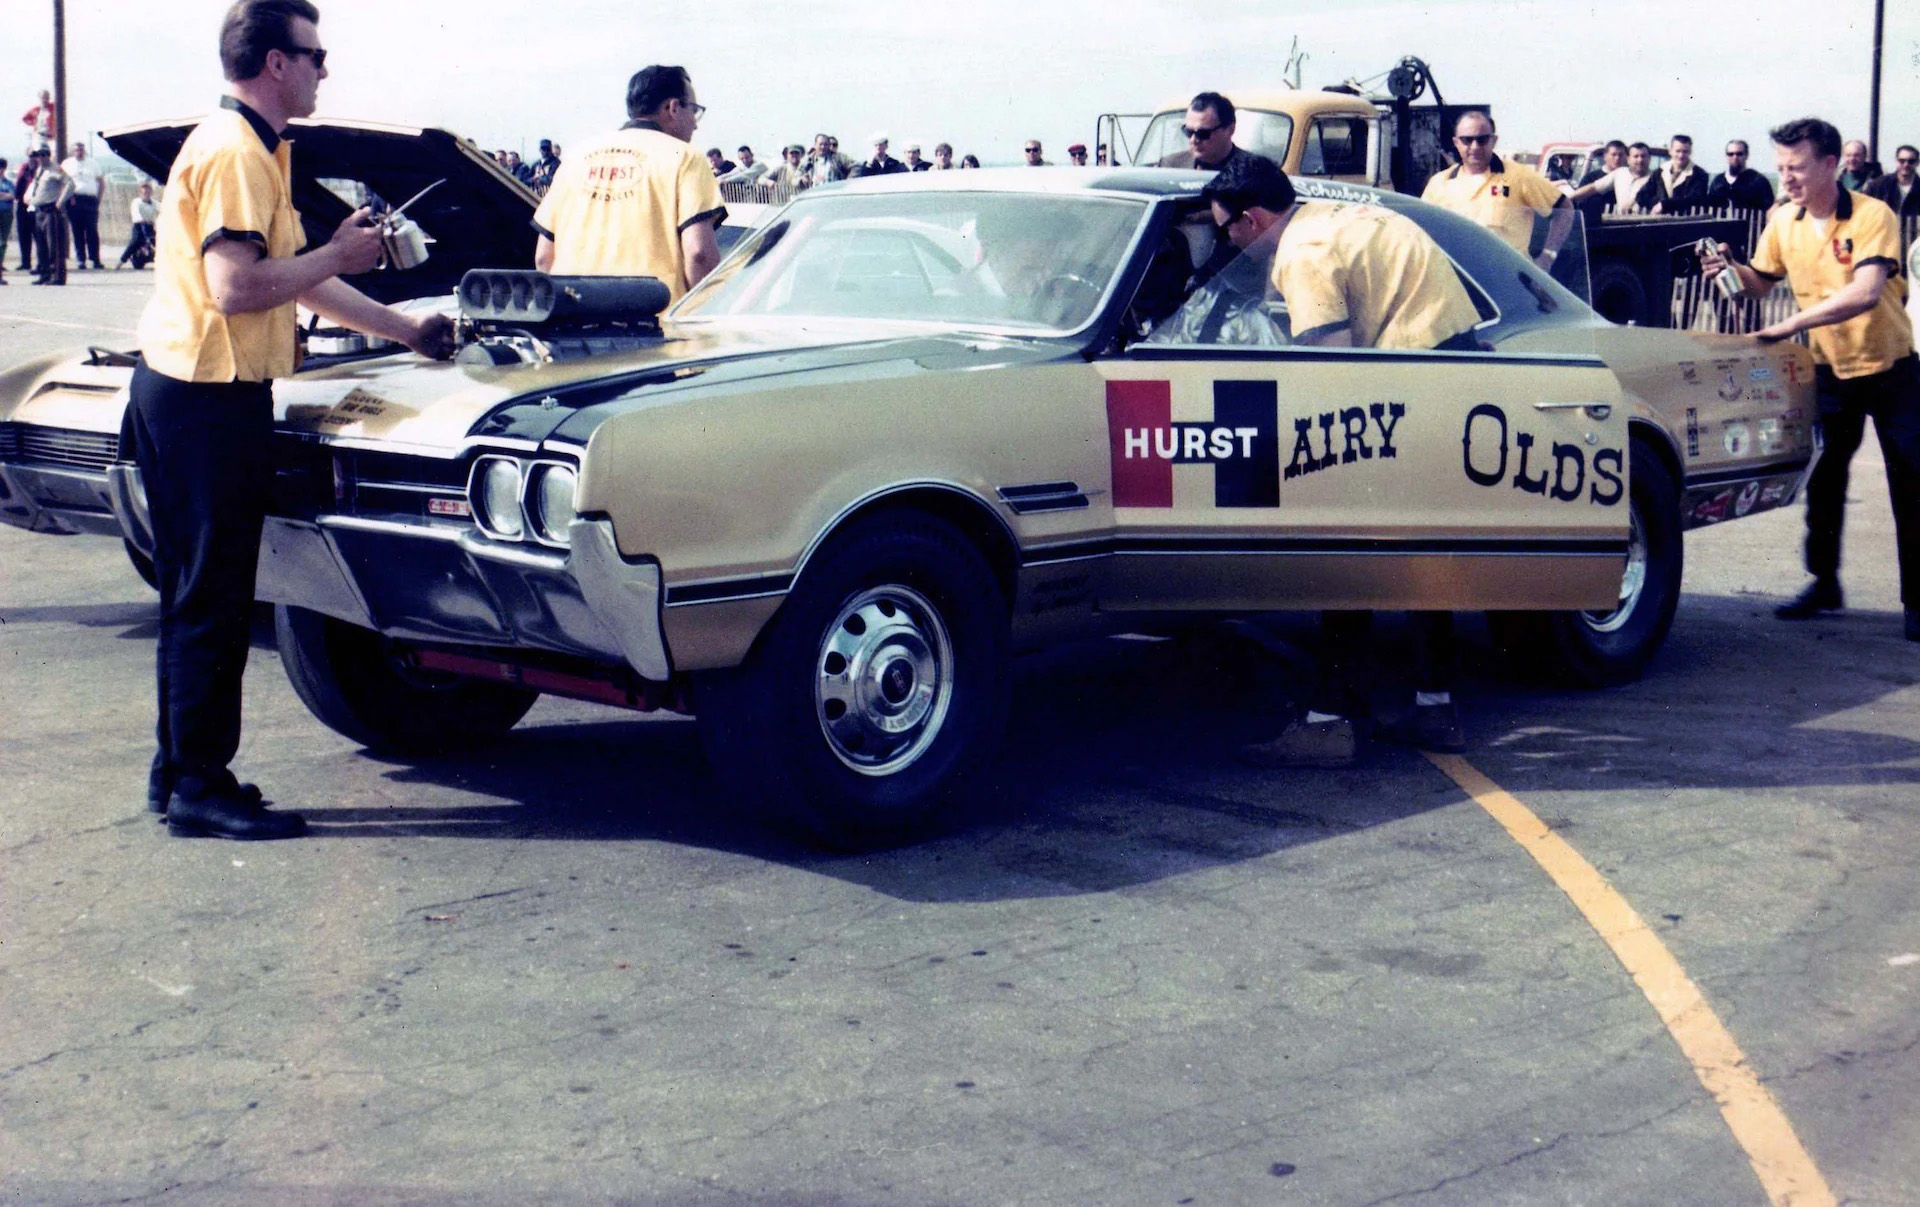
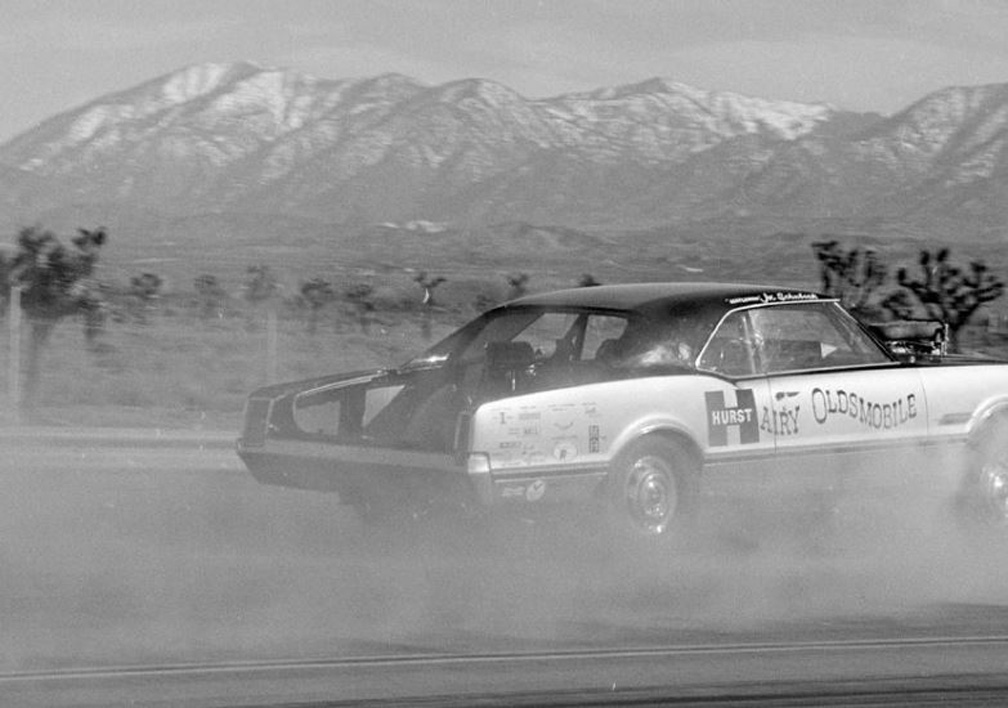
Intro: The first time I saw the Hurst Hairy Olds run the entire length of the drag strip burning all 4 slicks
was in 1966 at "GREAT LAKES DRAGAWAY" in Union Grove Wisconsin and it
was quite an amazing spectacle.
The Hurst team really put on quite a show back then, they even delivered "Gentleman" Joe Schubeck in a helicopter !
The owner of the dragstrip "Broadway" Bob Metzler and Joe Schubeck had a conversation on the track over a microphone
about all the features of the Twin Engine Olds, while the Hurst team scurried around the car getting it ready for the run.
To my excitement, I got the Monogram model kit in 1968. I was 8 years old at the time and built it... with no paint.
In 2001, I finally built a re-issue as best I could, as this is a "holy grail" kit for me and although I've enjoyed it all these years,
I always wanted to build the Hairy Olds in 1/25 scale, especially since all my other drag racing models are in 1/25 scale.
I would also like to see the engines with the hood and trunk off !
This sounds like a fun and challenging project and I want to see if I can pull it off ?
Now comes the fun part:
I need to gather up all the research, information, articles and photos I can find on this car.
After doing some research; I've found some issue's at hand.
1: Should I build the '66 Hairy Olds 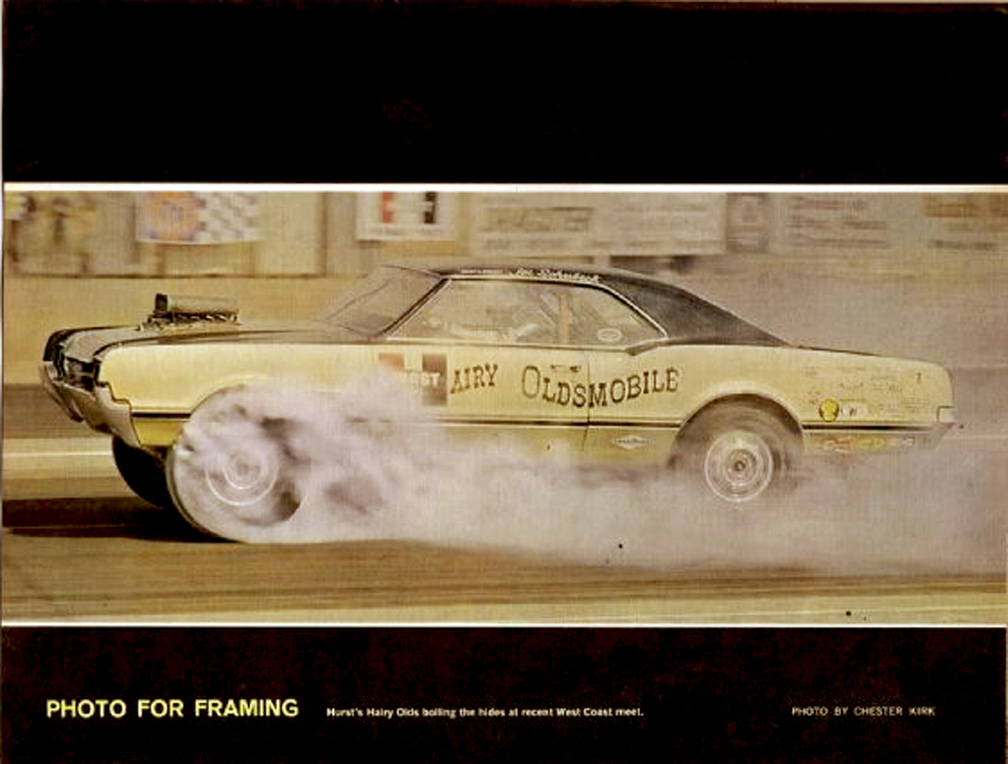 or the '67 Hairy Olds
 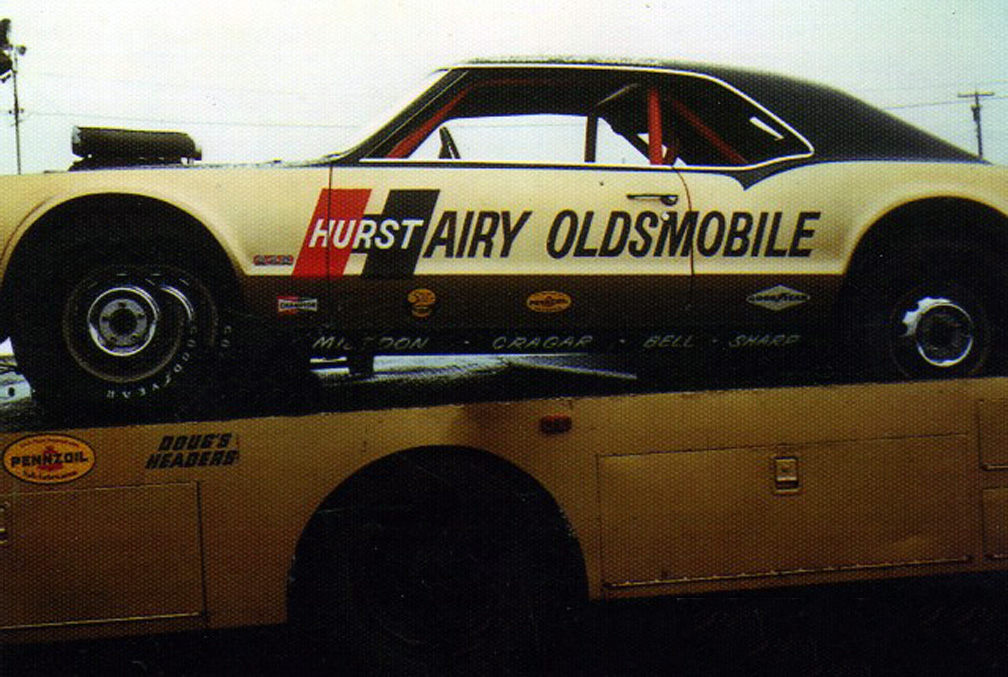 in 1/25 scale ?
I have the choice from building the 1966 Olds 442 from an AMT kit- or- build the '67 Olds 442 from the Lindburg 1/25 scale kit?
The problem I see with the '67 Hairy Olds is that all the wheel wells were radiused and raised to lower the body,
but the '66 version had a stock body. It's going to take a lot of work to alter 4 wheel wells on the '67 Lindburg 1/25 scale body.
2: I could use the 1/24 engines from the Monogram kit and it would be an easier since the upper headers are molded to the engine block,
but I want to detail these engines; so instead, I'm going to use '66 Olds Toronado engines with transaxle transmissions.
(Thoseengines can now be found in the new reissued MPC "The Californian" kit..... you'll need 2 kits).
3: Do I use and modify the monogram Hairy Olds 1/24 parts to fit a 1/25 scale model body, or do I modify the AMT Olds 442 chassis & interior parts ?
4: The decals for the '67 version are already in the Monogram kit, but they are in 1/24 scale,
but I don't think that will matter as I believe they will fit the Lindburg '67 Olds body.
5: If I do the '66 version, I'll need to get someone to do the art work and print the decals since they are completely different than the '67 version.
6. Doing new decals takes on another extremely challenging and tedious project that I'm not looking forward to getting into !
My conclusion..... Since the '67 version already exits in a 1/24 scale Monogram kit, I want to challenge myself and do the '66 version.
Beside's that, I like the '66 version more as it just seems to look more elegant.
I contacted Keven Gomske to help me with the art work, as he has done most of the decals for my Speed City Resin models-
and I know between Keven & I..... They will be 100% correct along with some added bonus decals on the sheet.
I plan to have these new Hurst Hairy Olds decals for sale on this website when they become available.
If your following along with this article, maybe you'll want to try to build one yourself?
Keep in mind you can substitute some of the parts/tires/wheels in this build and you don't have to get so involvedpainted
with some of the crazy detail that I'll be doing. You can keep it much simpler if you desire.
Otherwise, enjoy the read !
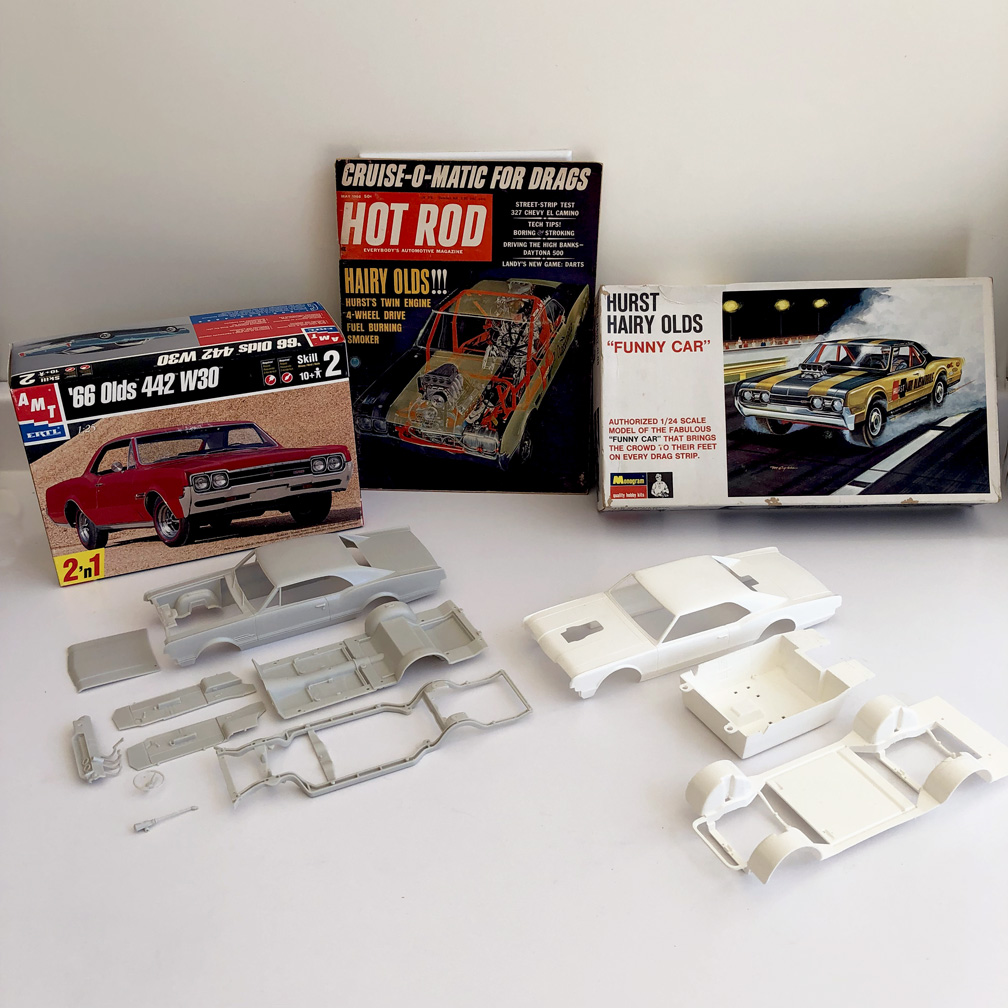
To build this project like I'm doing, you will need:
1. AMT- '66 Olds 442 W30 for: Chassis floor, door panels, dash, all inner wheel pieces. (2 kits if using the front A arms on F&R suspension).
2. MPC- "The Californian" Custom Toronado reissue (2- kits) for: for engines/transaxles & wheels.
3. Monogram- Hurst Hairy Olds Twin Engine Funny Car for: Frame, F&R suspension, valve covers, seats, roll bars, center console.
4. Polar Lights- Undertaker Dragster (2-kits) if you want correct pie crust center-line cheater slicks.
5. Gather up all the other miscellaneous parts you'll need.
6. 3oz lead free solder .062" / 1.6mm. (to be used for headers).
7.
Speed City- "Hurst Hairy Oldsmobile '66 Cutlass Decals".
8. Speed City- 1/25 Hilborn Bug Catchers (2 are needed).
- You can use the engines & headers from the Monogram Hairy Olds kit even though they're not as detailed.
- The Monogram slicks/tires are too large for a 1/25 model, so you will need to find 2 sets of pie crust skinny slicks. (eBay is recommended).
 8/20/2022
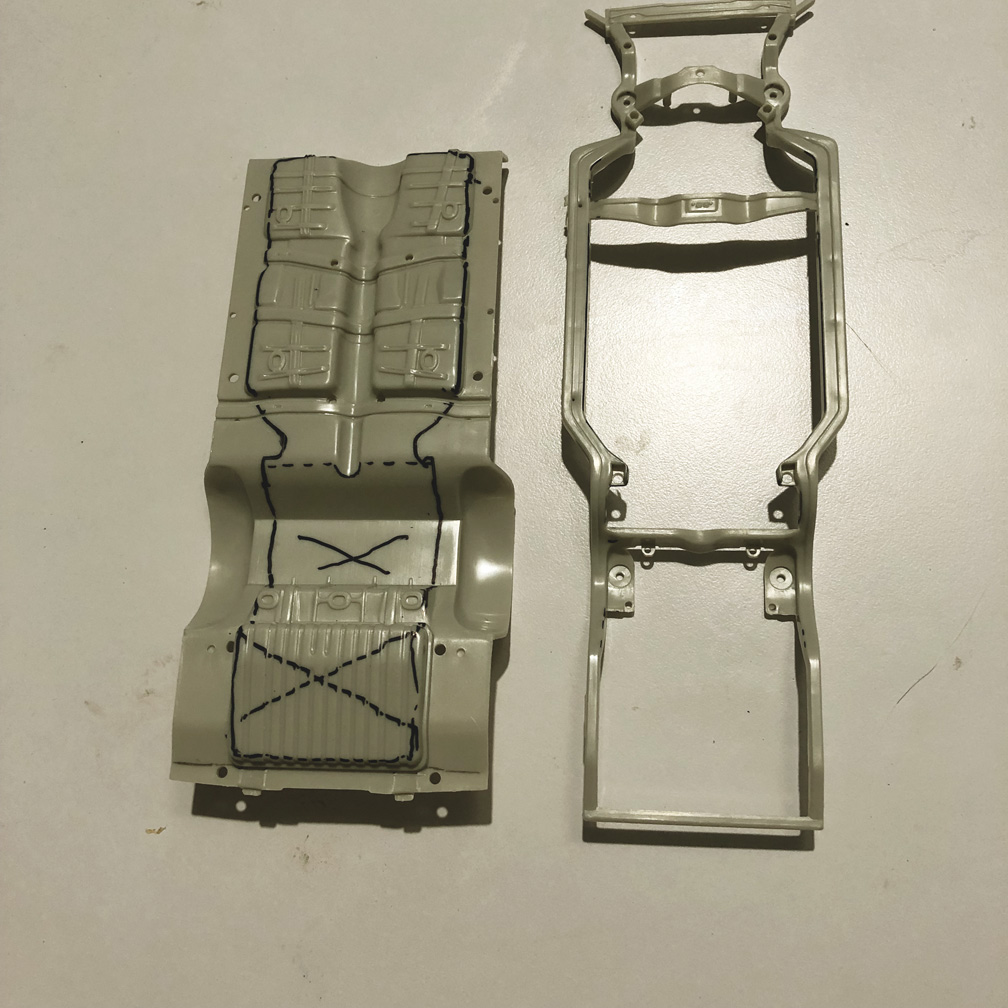
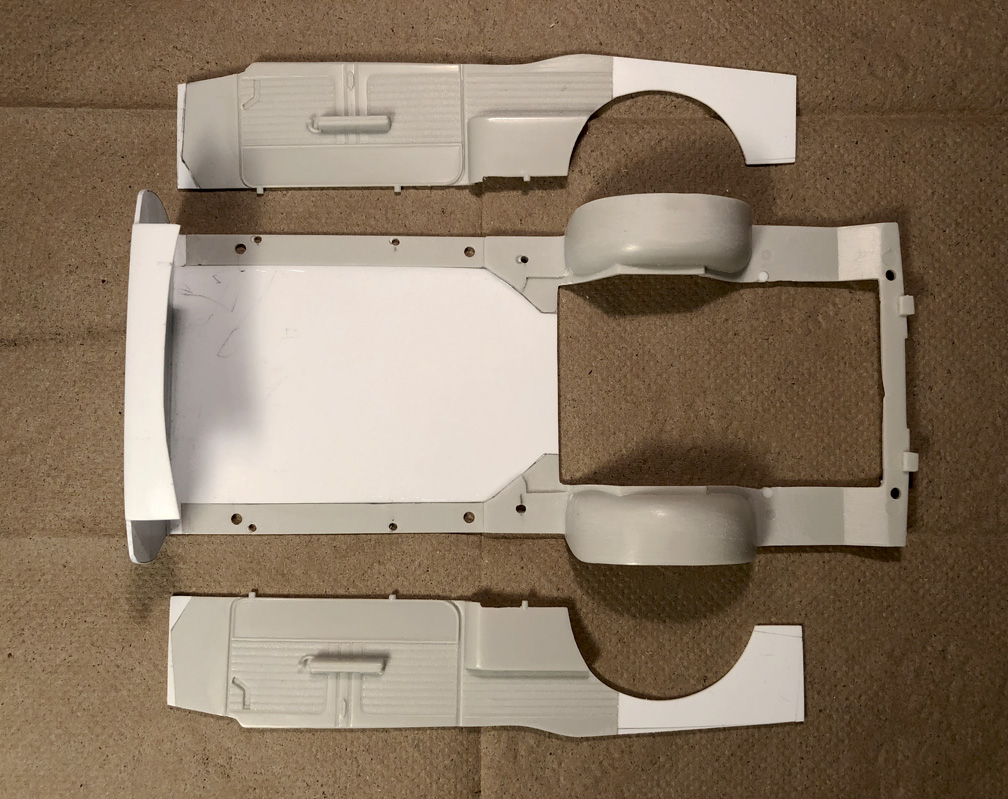
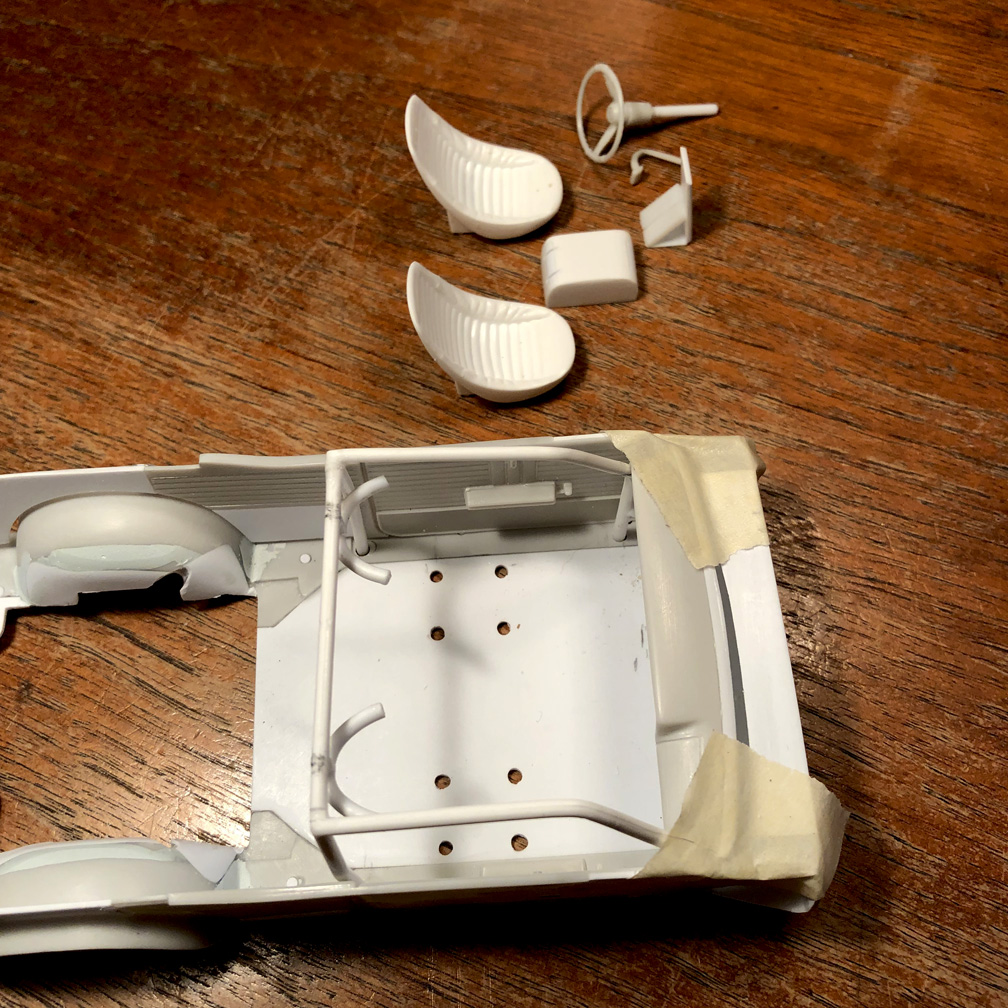
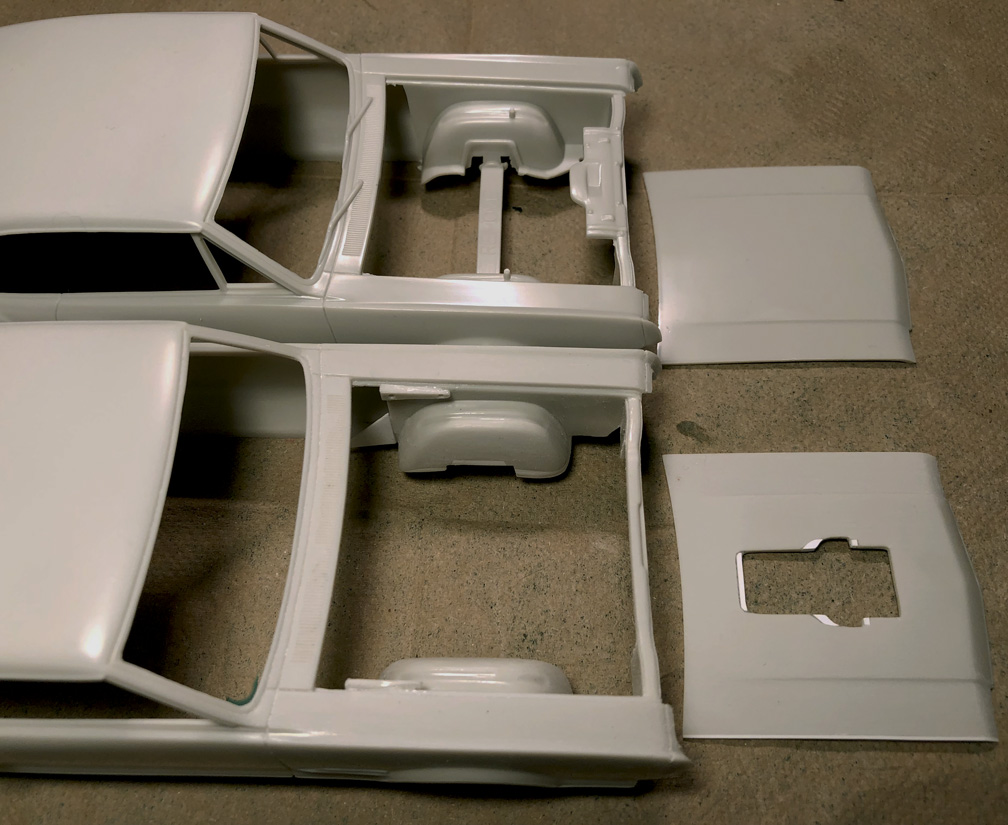
Here's what I have to work with.
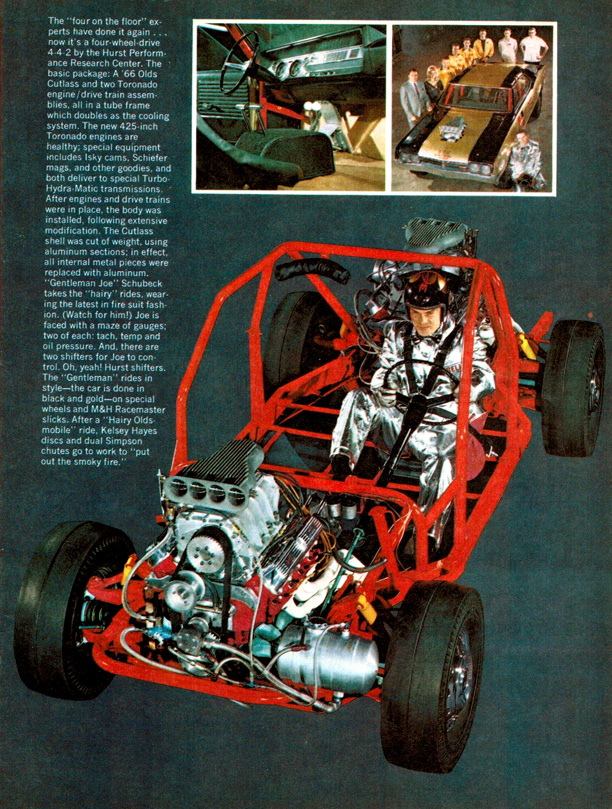
Hot Rod magazine May 1966 did a 4 page feature article on the '66 Olds and I'll be using those reference photos and info from that magazine.
I spent 3 days mulling over what to use for donor parts? Do I use the Monogram 1/24 scale parts on my 1/25 scale project: or try to use the AMT '66 Olds?
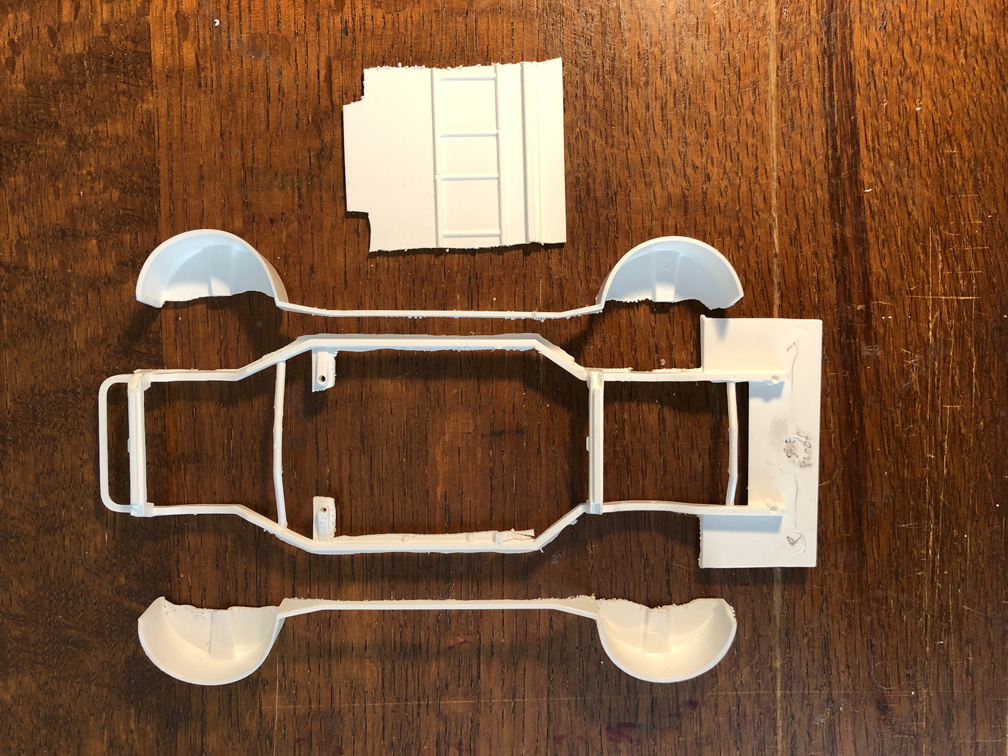
Fortunately, AMT made the '66 Olds and made the frame separately from the interior floor and it also comes with poseable front wheels (a nice bonus).
Since the interior floor, dash and door panels already fits the 1/25 scale body, that's what I'm going to start with.
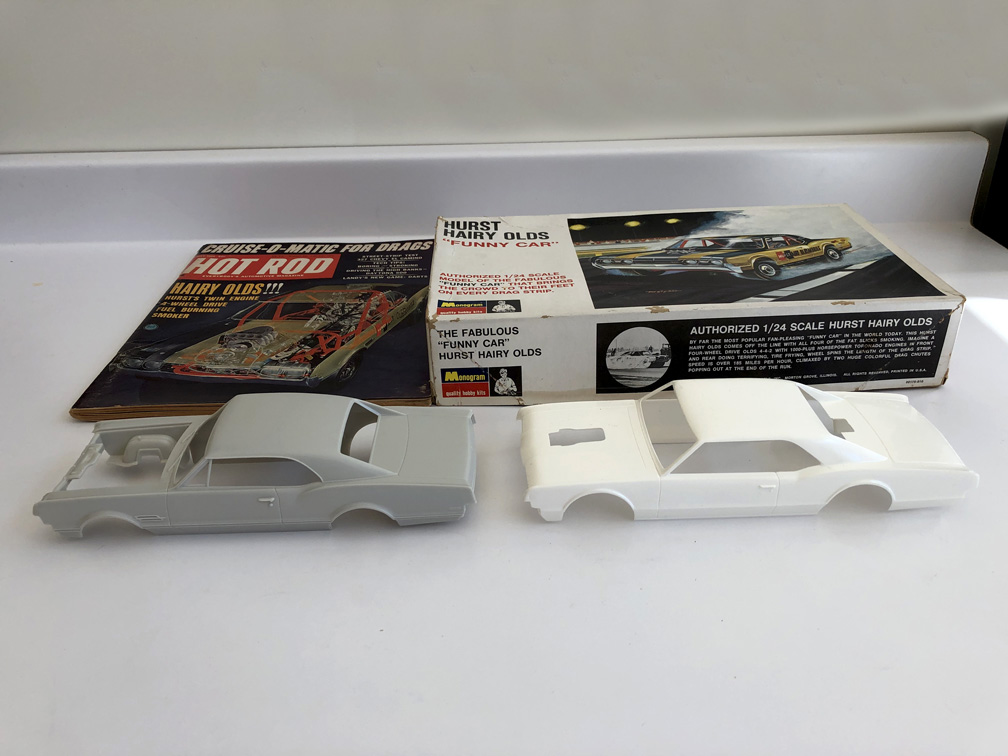
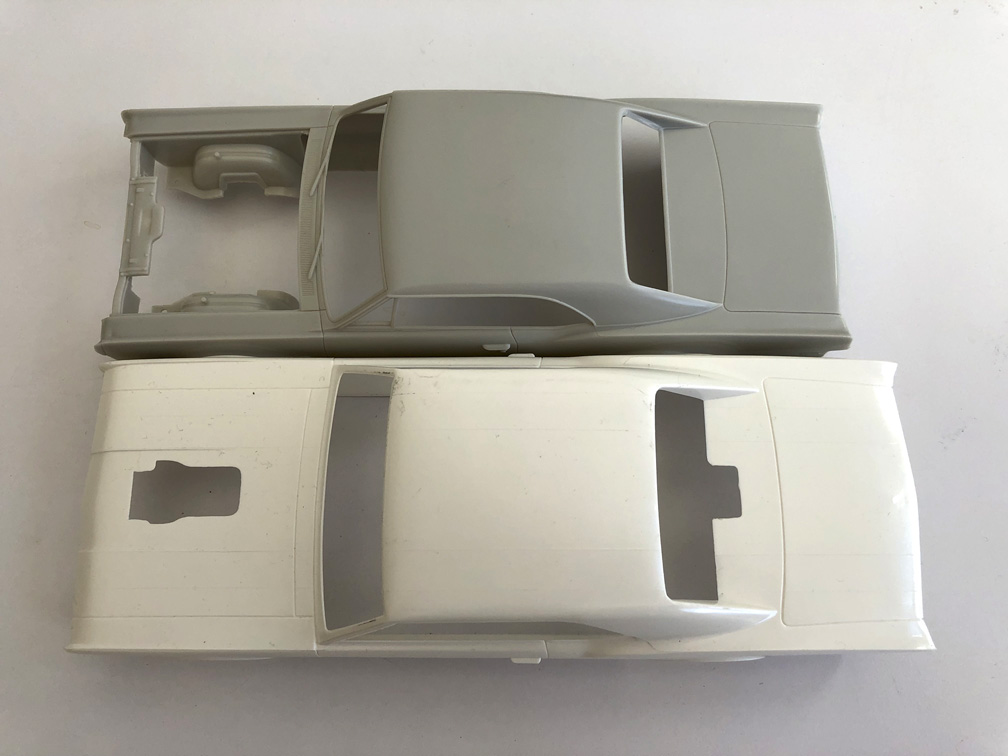
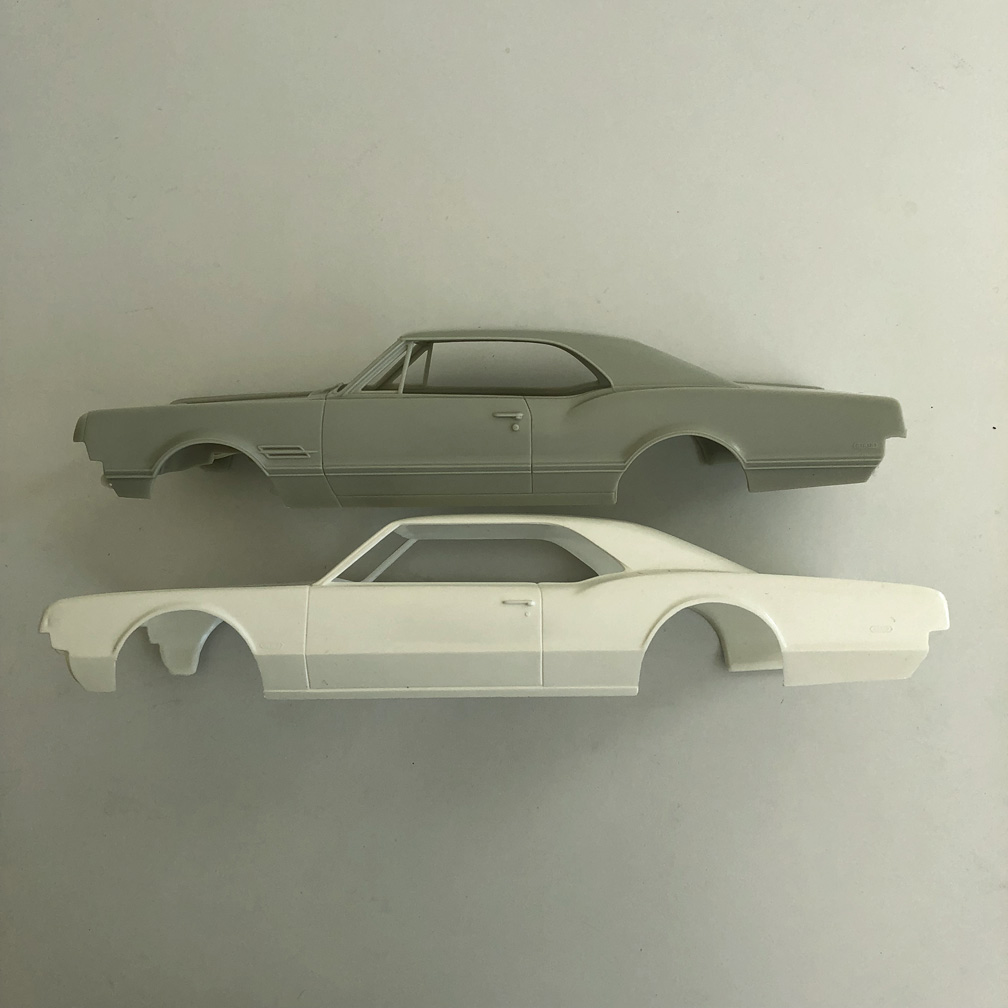
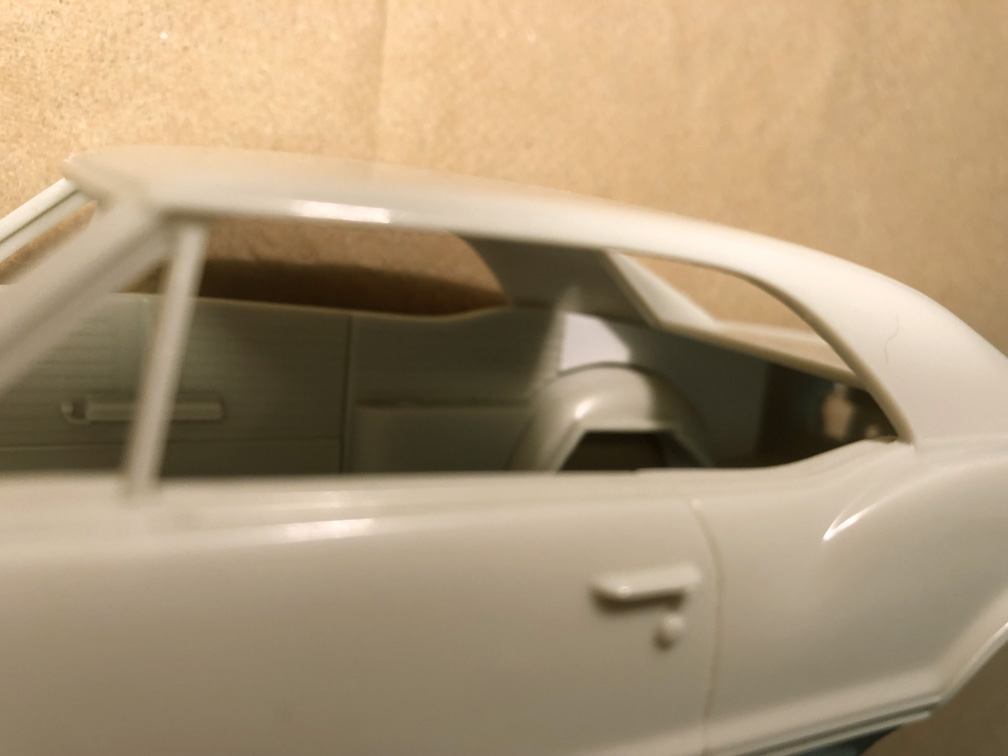
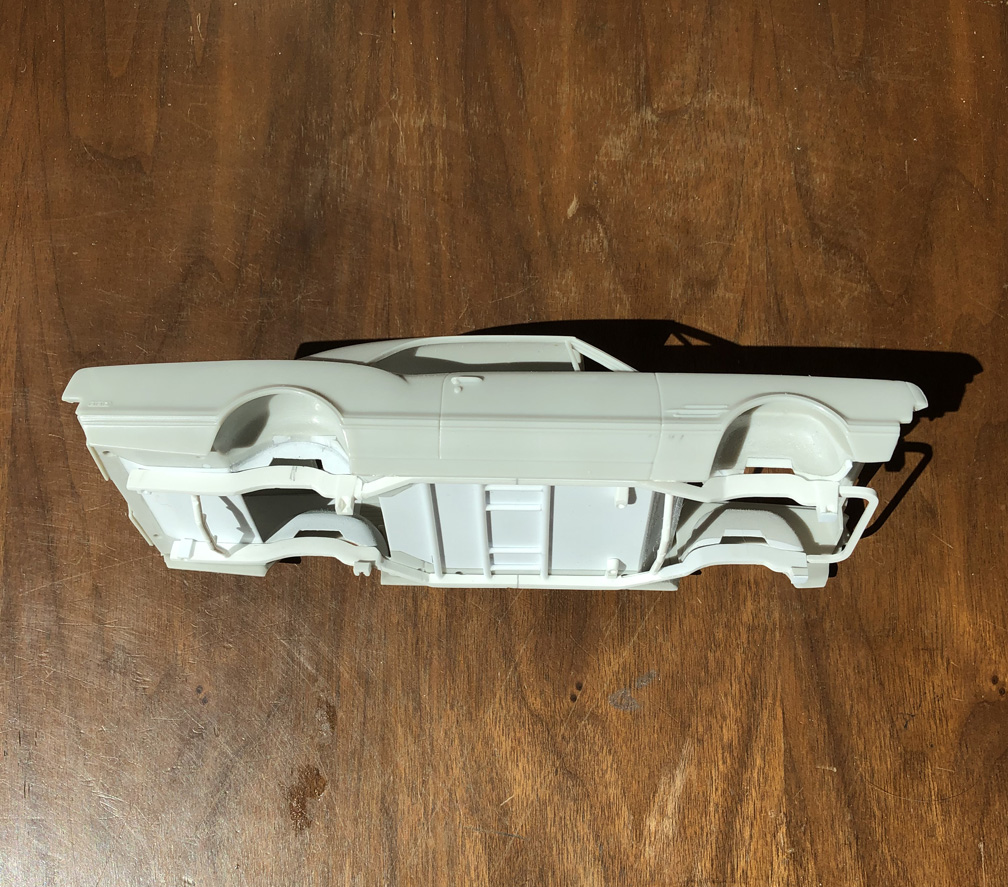
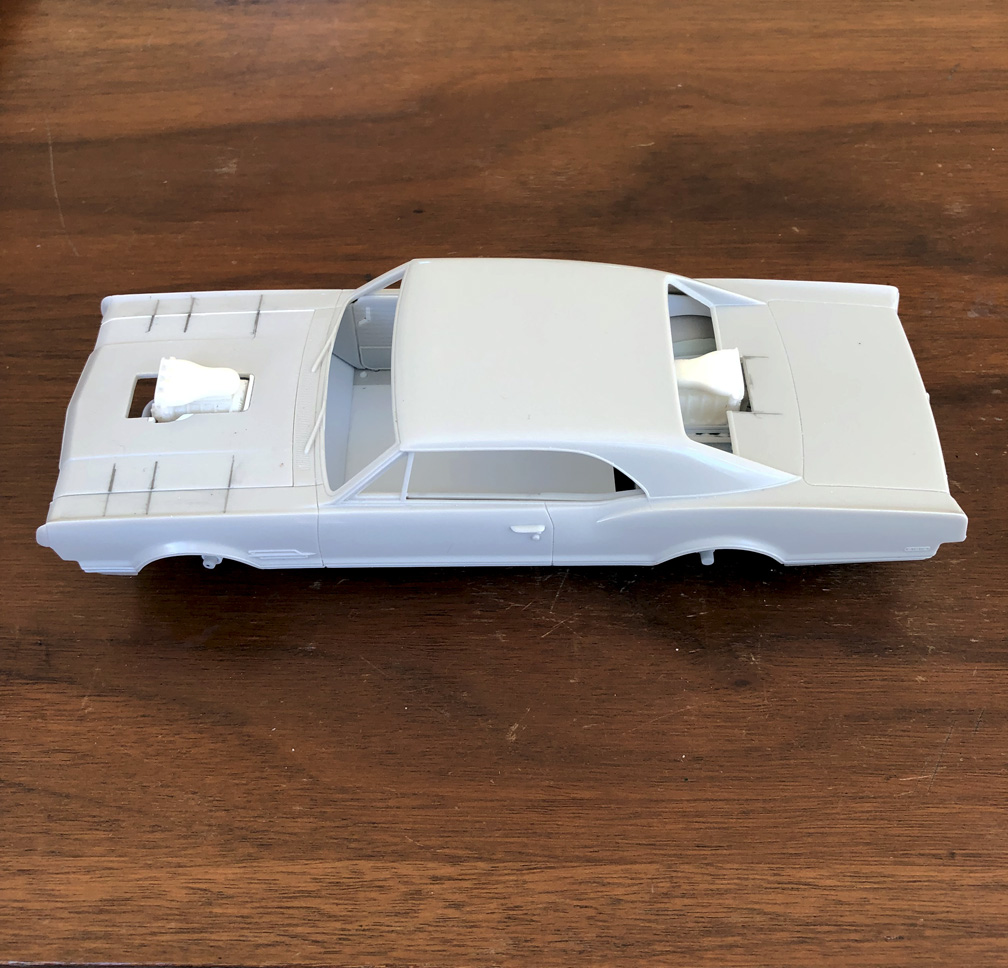
You can clearly see the difference in scale and body style on these two models.
The '67 Monogram Hurst Hairy Olds had all it's wheel wells radiused to lower the car and may have helped with handling too?
You can really see the difference between the AMT 1/25 1966 Olds body (gray) and the Monogram 1/24 1967 Olds altered body (white).
 8/25/2022
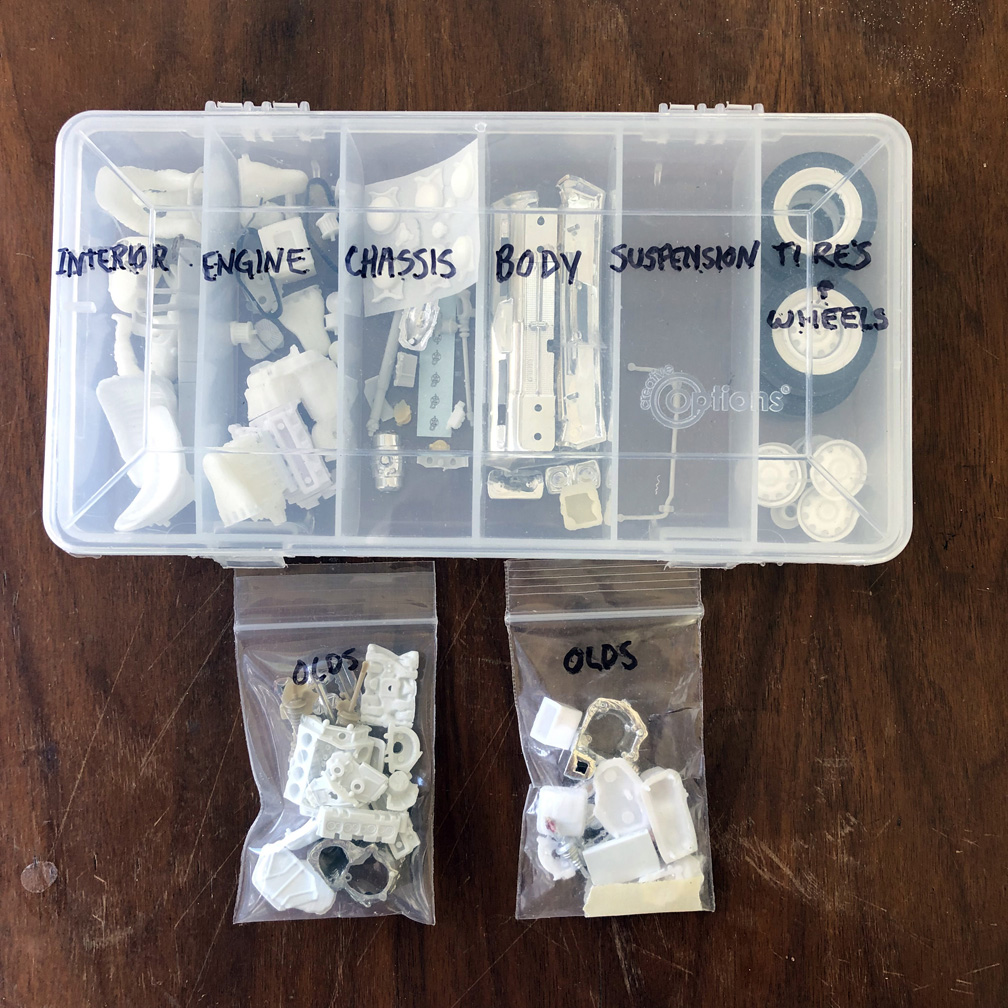
When starting any project, the first thing I recommend is gathering all the parts you'll need.
I found these parts bins at Hobby Lobby for a few dollars (I have 6 of them).
These are great for keeping all the parts separately in one place and never losing parts again !
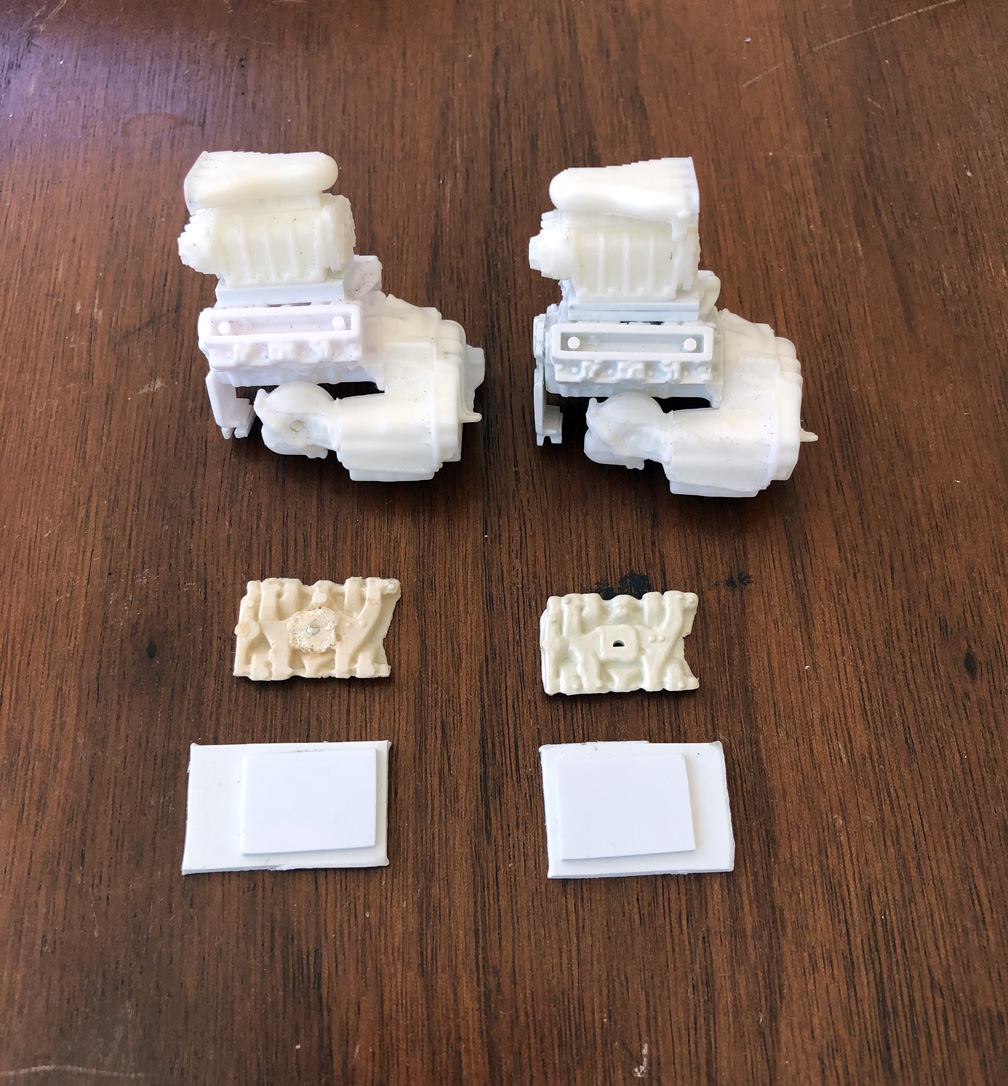
I'm using 2 engines from the MPC Californian Toronado kits.
 It is going to take too much work to use the Monogram interior tub as it will need to be shortened and narrowed to fit the AMT body,
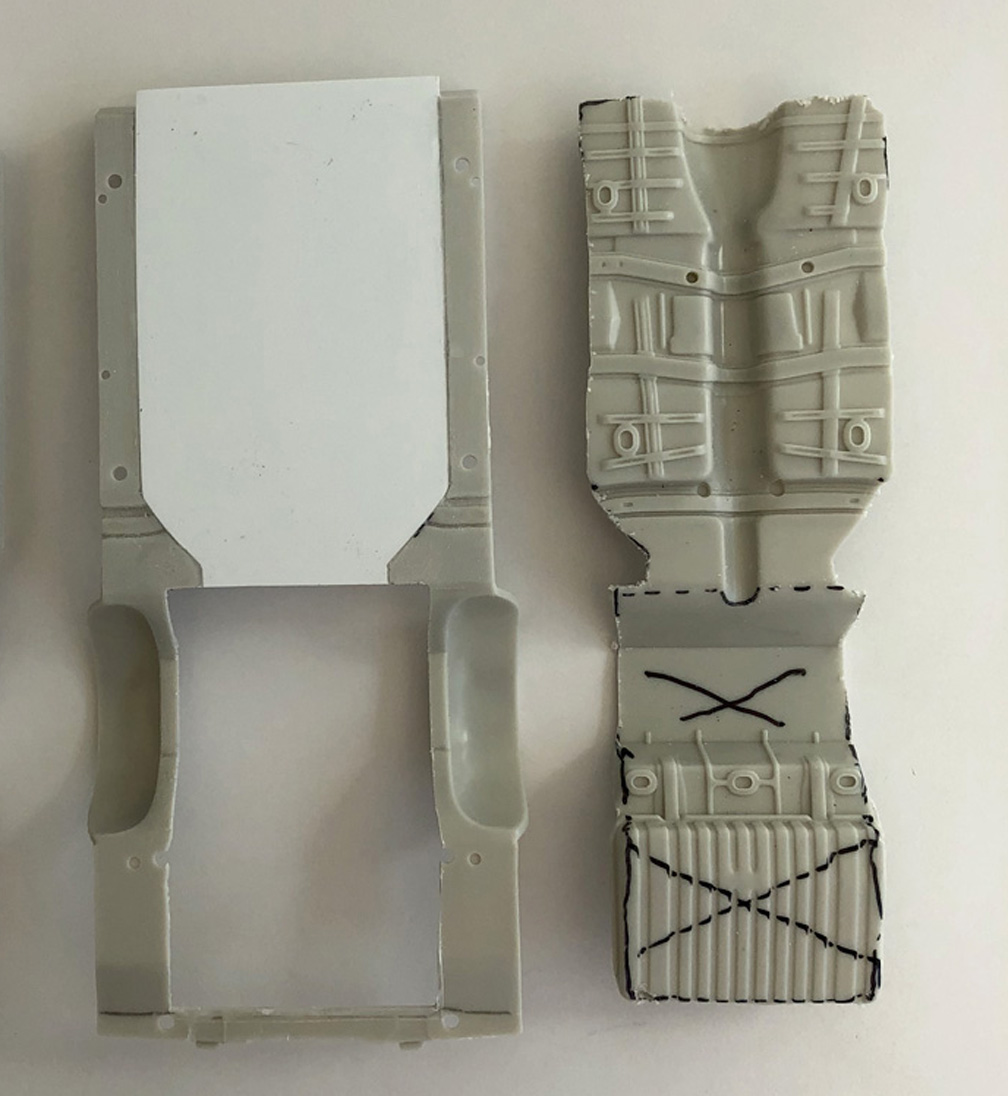
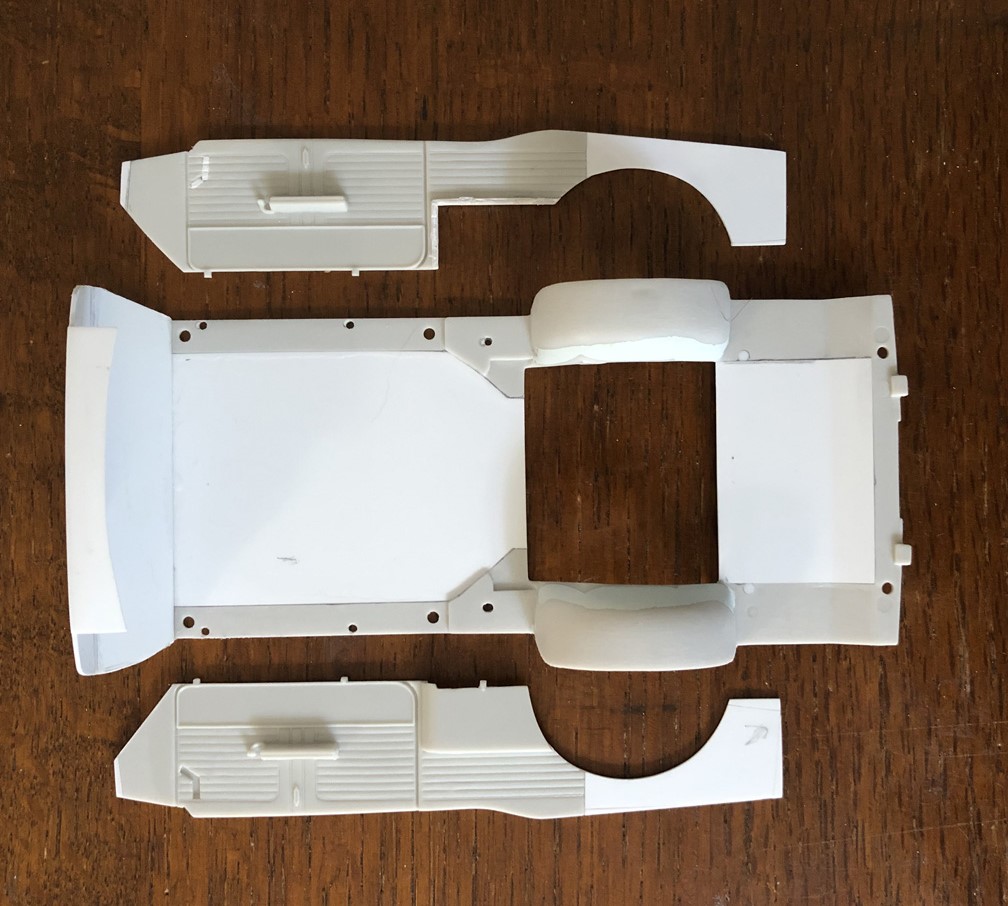
so I decided to use the interior floor & door panels from the AMT '66 OLDS.
The floor
needs to be made flat, so I marked where I would need to cut out the floor.
At this point, I'm still undecided if I want to use the frame from the AMT '66 Olds or the Monogram Hairy Olds kit ?
. 8/26/ 2022
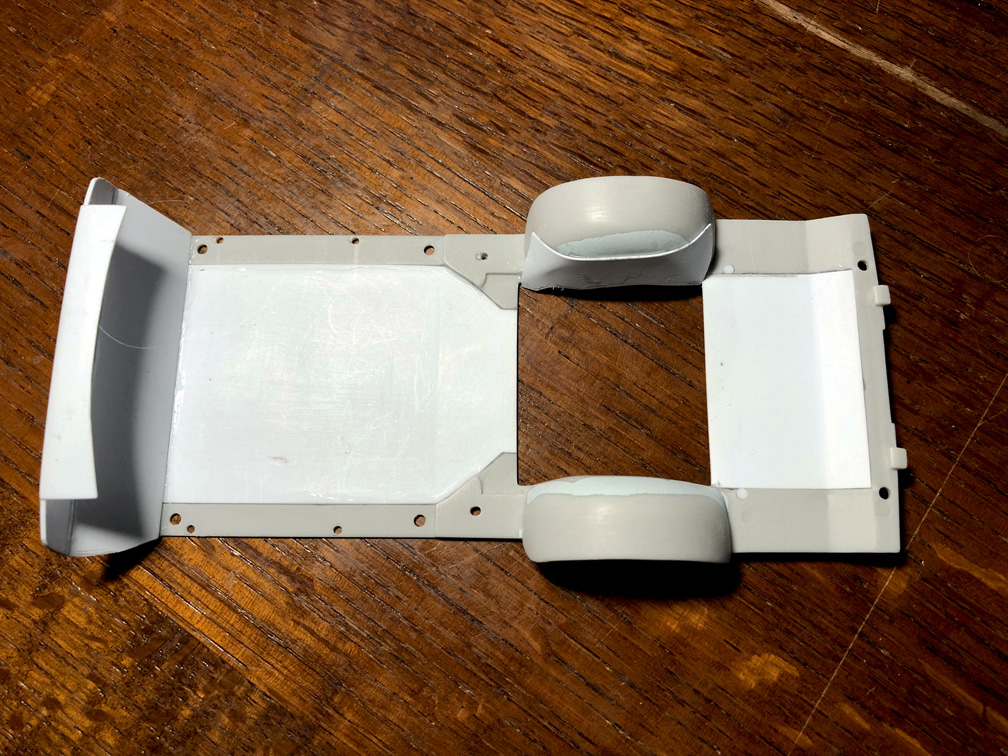
.040" sheet was used to fill in the floor. I later ended up using .040" sheet to fill the trunk floor too.
 9/28/2022
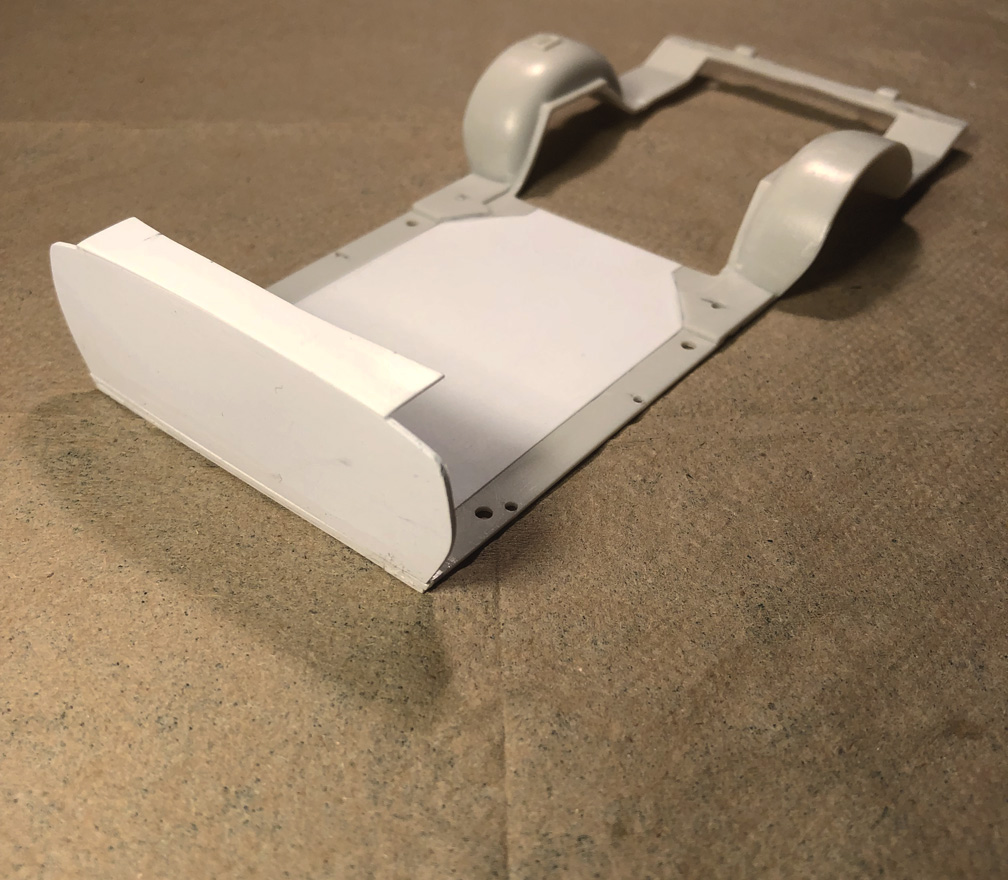
A new cowl extension and firewall was made from .040" sheet.
I may have to cut back the firewall later so the transaxle will fit, but it still needs to be made like this first !
 8/30/2022
Using the 1st reference photo, I want to extend the door panels into the trunk.
Since I will be opening the trunk later, this will be a nice added feature.
 9/3/2022
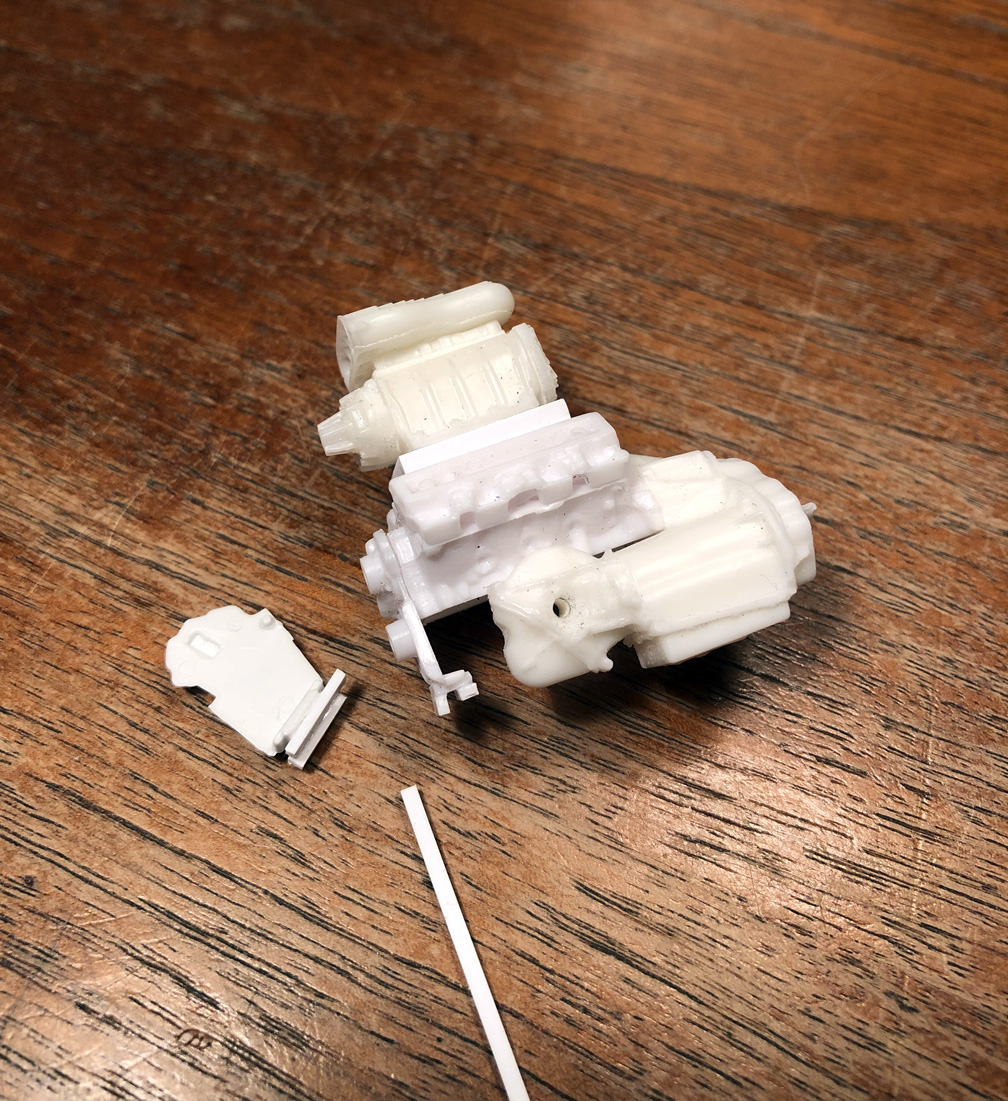
I needed to assemble a Toronado engine to see how the Transaxle will fit the firewall.
- If your using the Monogram engines, you'll need to temporarily assemble them now -
I thought of using the 1/24 scale intake manifolds from the Monogram Hairy Olds kit (which could work with some alterations) but instead,
I cut 2 pieces of .040" sheet and cemented them together to make a .120" High Rise to fit the '66 Olds intake manifold.
I will need to fill in some empty areas on the intake with putty.
Rather than assemble all the transaxle parts from the MPC Californian kits,
I'm taking a short cut and using 2 transaxles from the Speed City Resin 1966 Oldsmobile,
After test fitting the engine, I can see now how much I need to cut back part of the firewall (foot rest area).
I'm using 2 Speed City Resin- GMC 6-71 Blowers and 2- Hilbron Bug Catchers on these engines.
 9/6/2022
After measuring where the transaxle will sit, I drew lines to where a new "angled floor" would be.
A piece of .040" sheet was added for the floor and trunk. Super Glue the floor for strength.
I then cut out the unwanted vertical firewall & horizontal floor pieces.
The front of the door sides had to be re-cut to match the new angled floor.
I cut out only one of the rear door panel sections in this photo.
 9/9/2022
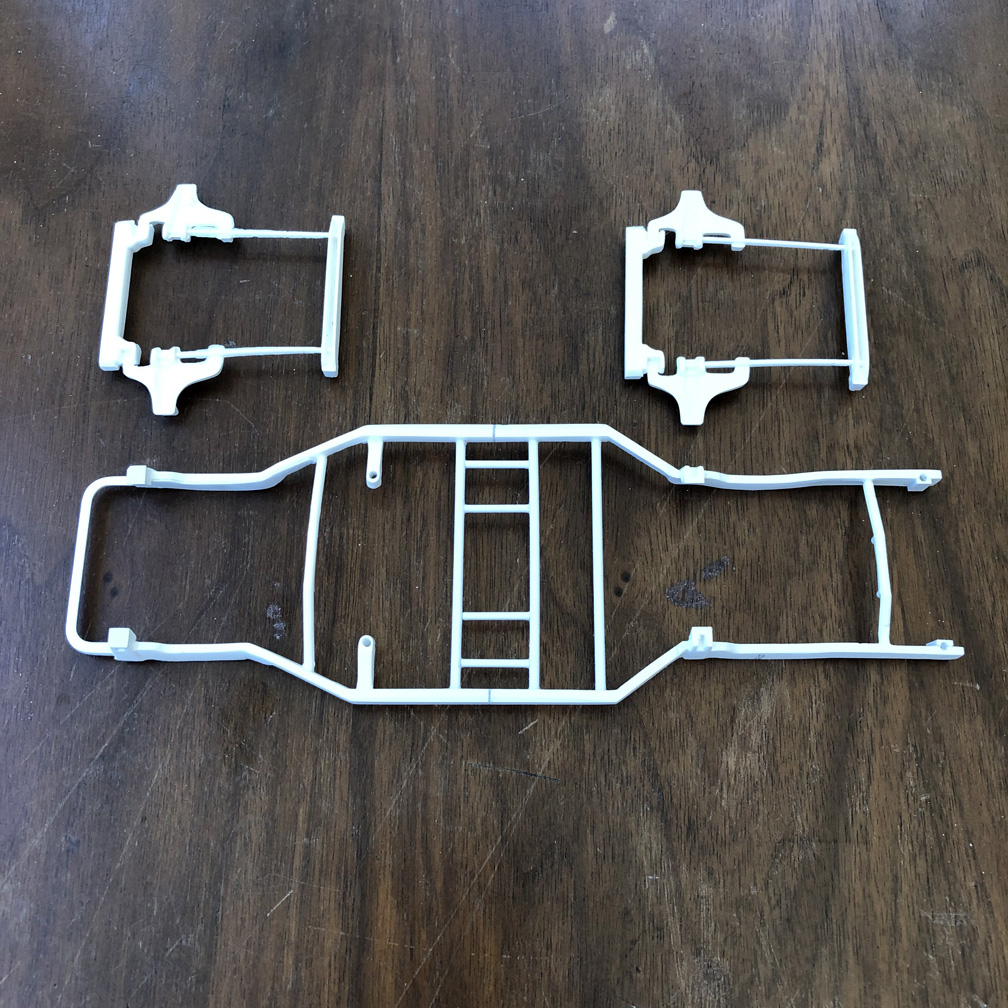
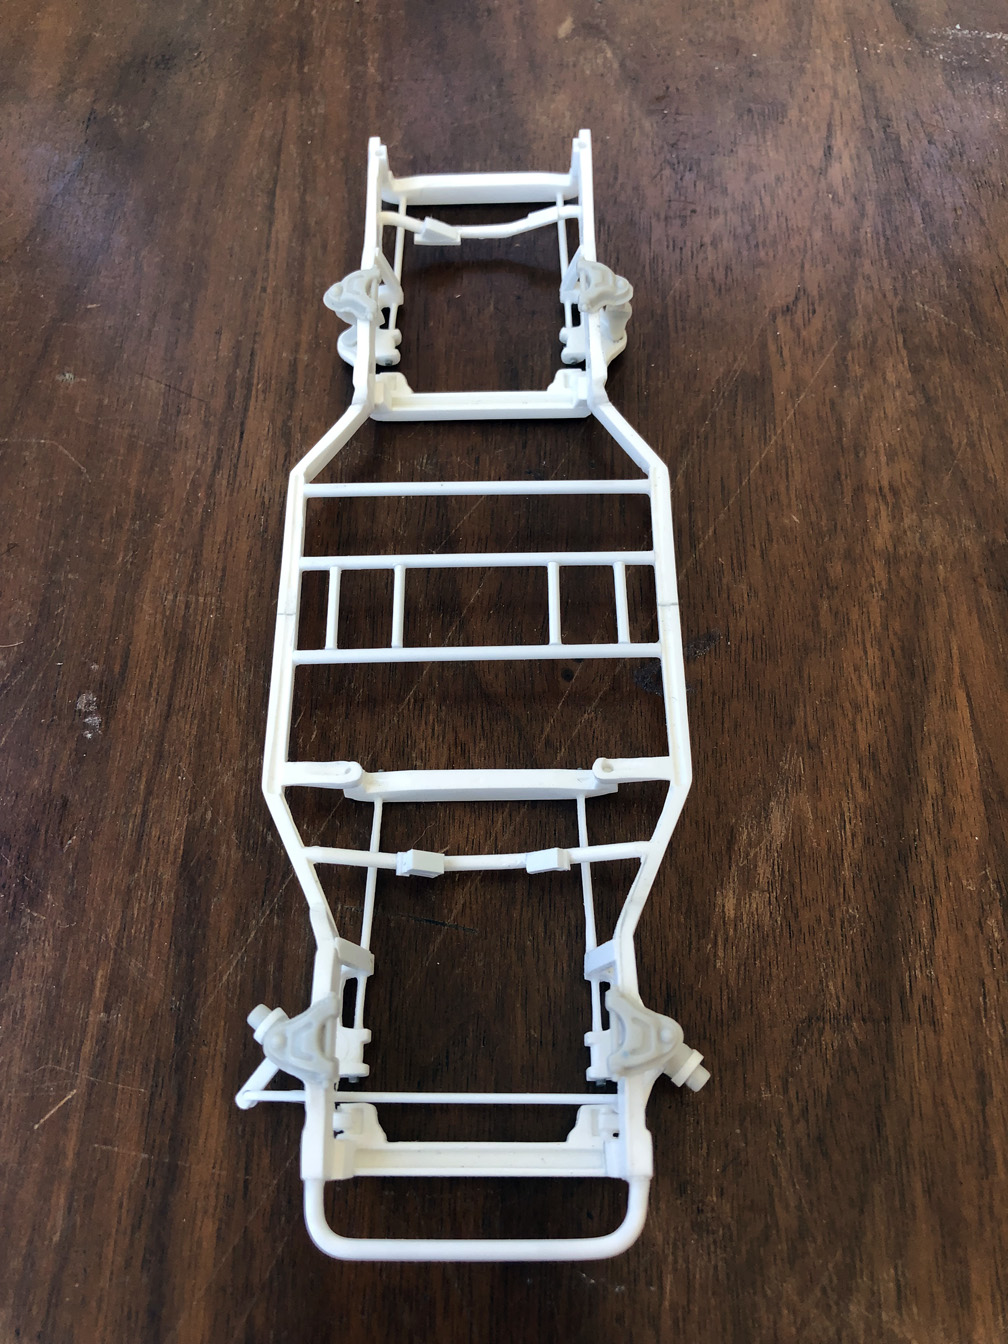
After some trial and error with the AMT '66 Olds Frame and suspension,
I decide the best solution for the frame is to use the Monogram Hurst Hairy Olds frame.
Here you can see all the cuts to remove unwanted sections from a Monogram Hurst Hairy Olds 1/24 chassis.
Not sure if I want to use the Monogram trunk floor yet ?, So I'm leaving it in for now.
 9/11/2022
.020" strip was added around the wheel wells to meet the Monogram frame rails.
I'll be filling in all the unwanted holes in the floor & trunk later.
 9/12/2022
Here you can see the cuts in the frame rails to shorten the wheel base. 7 m.m. were removed and frame was glued back together.
The front motor mounts on the Monogram frame were cut off to lower the front & rear suspension and lower the engines to the proper height.
The rear motor mounts weren't removed at this time, so you can see how much was removed.
 9/13/2022
A lot of clean up was done to the Monogram frame, along with filling sink holes with C.A.
Round Tube for the seat mounts were made from .080" and 1/16 round tube.
 9/15/2022
.040" sheet & strip was used to fill in the F&R wheel wells.
I put the frame behind the sheet and traced it out and then cut and sanded until it fit.
TO HAVE POSABLE FRONT WHEELS
If you don't want poseable wheels, you can skip these next steps.
There are several ways to make the front wheels turn, this is how I'm choosing to do it.
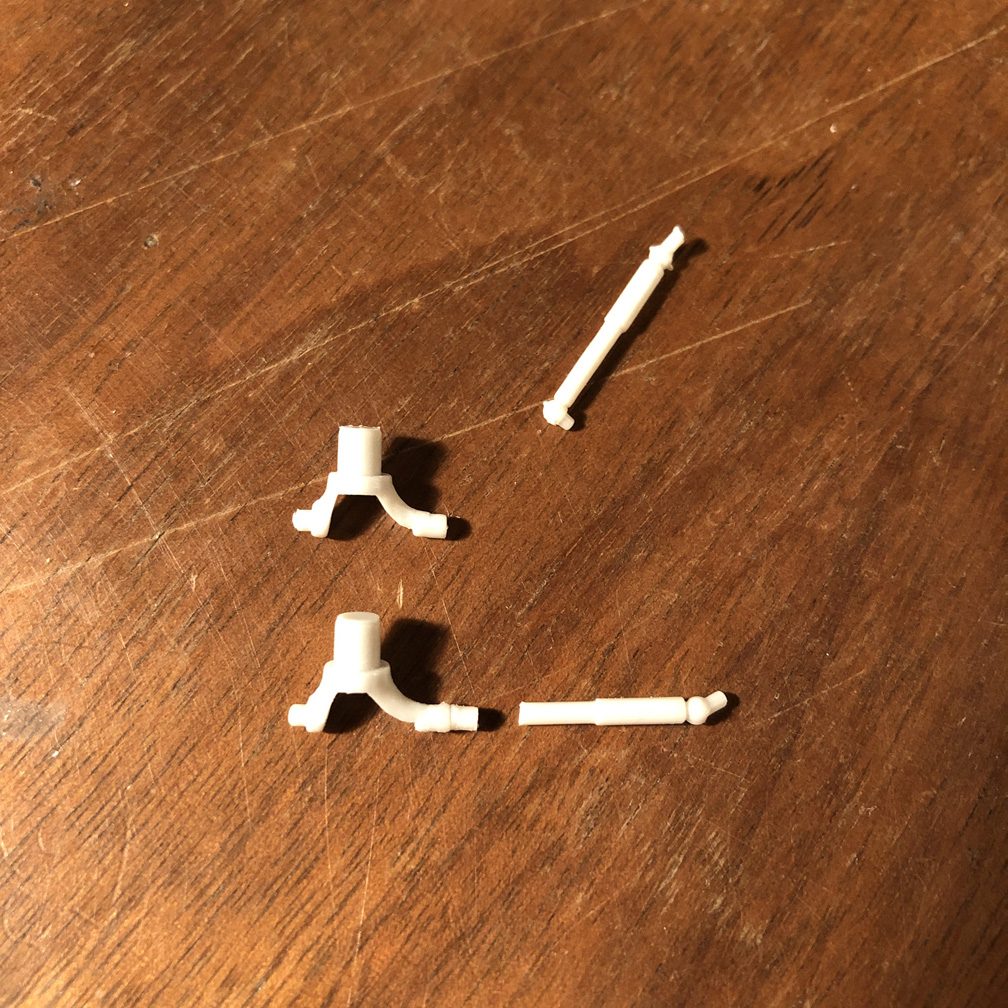

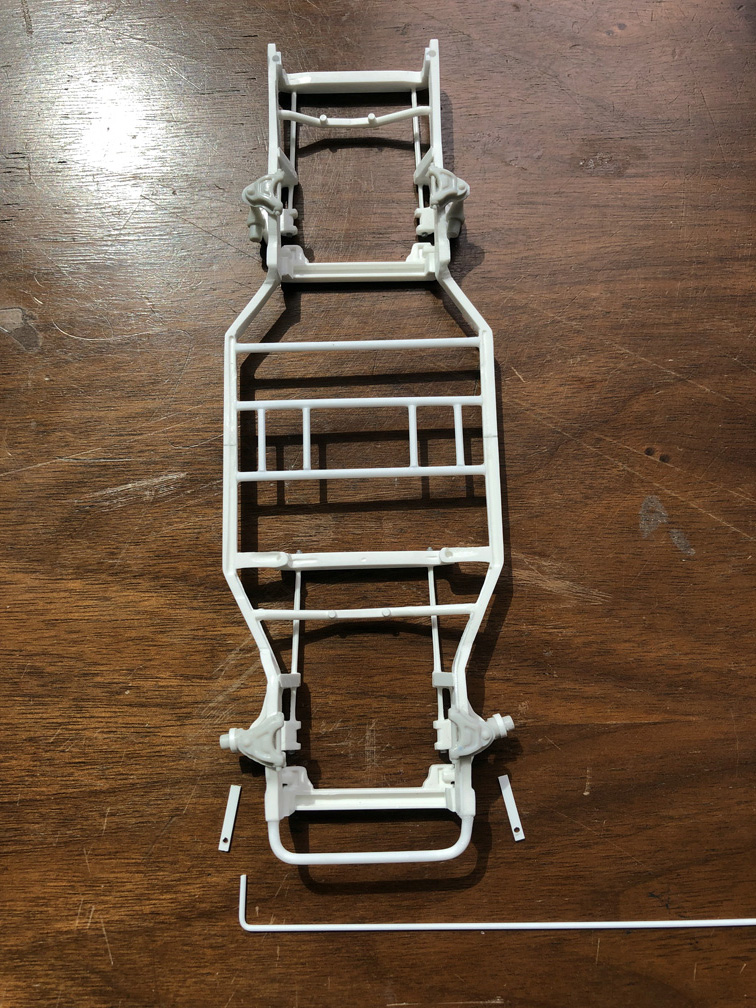
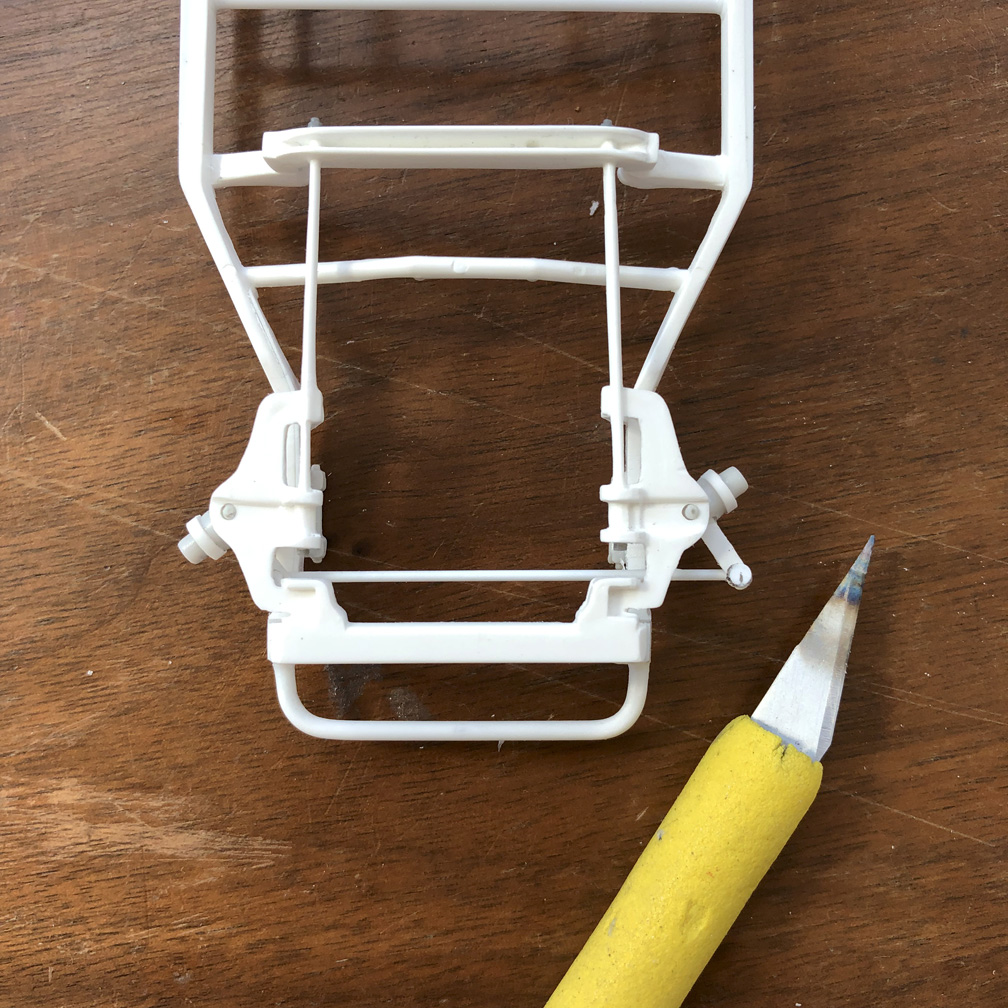
Photo 1. Because of the slicks; the suspension needs to be lowered. Extension pieces were cut from the shocks in the AMT '66 Olds kit,
since the shocks fit the A arm holes and won't be needed in this build.
Photo 2. After finding where the slicks should sit in the wheel wells,
holes were drilled in the Monogram A Arms to locate where the spindle holes need to be drilled.
My
measurements were at 3'-9/12". That equals to: 45 1/2 in m.m.
I'm also using a 2 sets of A arms (for the top A arms) from the AMT '66 Olds kits. (2 kits are needed).
The front & rear suspension pieces were first glued with liquid cement and after everything was centered, super glued sealed it all.
8 - Nut & Bolt Heads from MING were added to the front & rear of the torsion bars (a nice added detail).
Photo 3. Using Evergreen .030 x .080" plastic strip, I first drilled holes to fit the .045" rod I'll be using for the tie rod.
The pieces were then glued to the back of the spindles. After slowly bending a .045" plastic rod,
I heated the bend up with a lighter while holding it against a metal ruler. Heating up the plastic will maintain the bend !
Photo 4. After the rod was measured so the wheels will be straight, I made the second bend the same way.
The ends of the plastic rod was melted FLAT using an old razor blade heated with a lighter.
I'll be adding some photo etched bolt heads to the flatten end later. We now have poseable front wheels !
This took 4 days of build time, working 3-4 hours per day.
 9/21/2022
I'm using 2 sets of slicks from original Aurora Undertaker Dragster slicks,
since they have the correct 7.5" Pie Crust Slicks with a Cheater Line down the center.
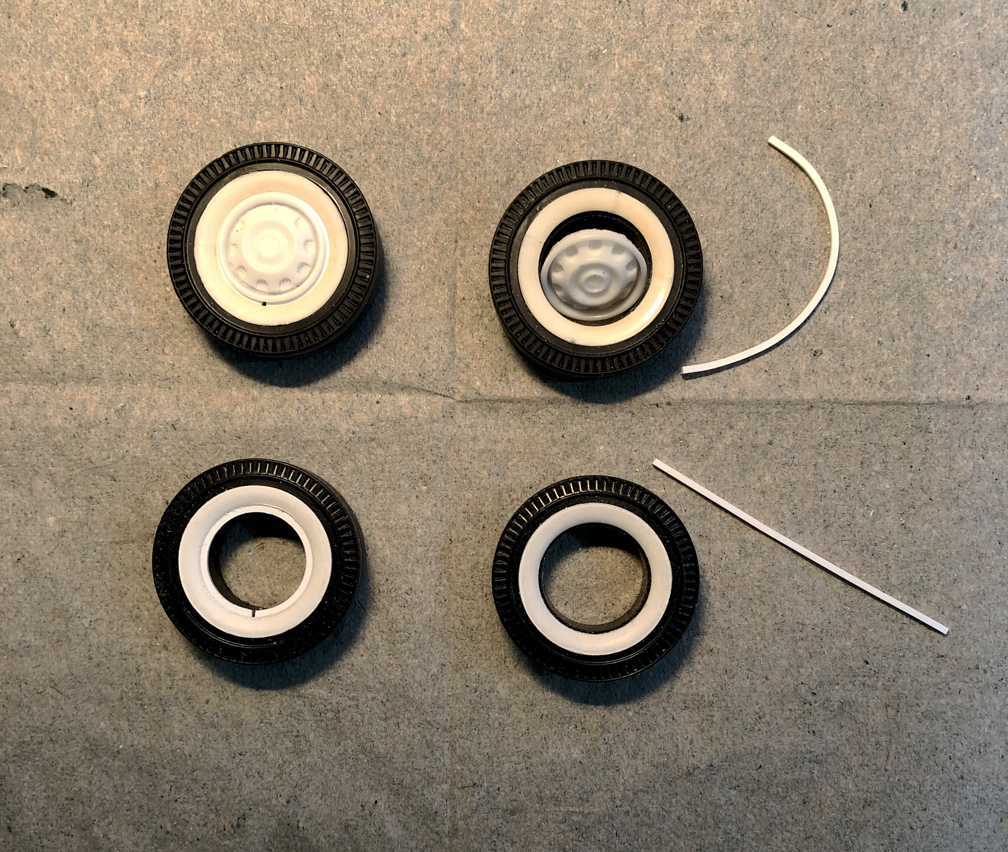 Although the MPC "The Californian" Toronado wheels/hub caps fit the Undertaker slicks just fine,
I prefer the wheels/hub caps in my Speed City Resin '66 Toronado resin model, as they have the correct Oldsmobile logo in center hub cap.
The MPC Californian Toronado wheels only have some sort of knob sticking out of it. (?)
I'm going to have the Oldsmobile logo on the hub cap made in decal form, so you'll be able to use the MPC Californian hub caps.
Just cut the knob off the cap, sand it down and use the decal instead.
To make the Speed City Resin '66 Toronado wheels fit the Undertaker white walls, I need to wrap .030" x .040 strip to the inside of the white wall.
On the right you can see how the hubcaps don't fit, and I'm showing the pieces needed to make the white wall hole smaller.
On the left are the completed white walls.
This is a lot of extra work that you can avoid by using the MPC Californian wheels and the new Speed City Oldsmobile Decal later on.
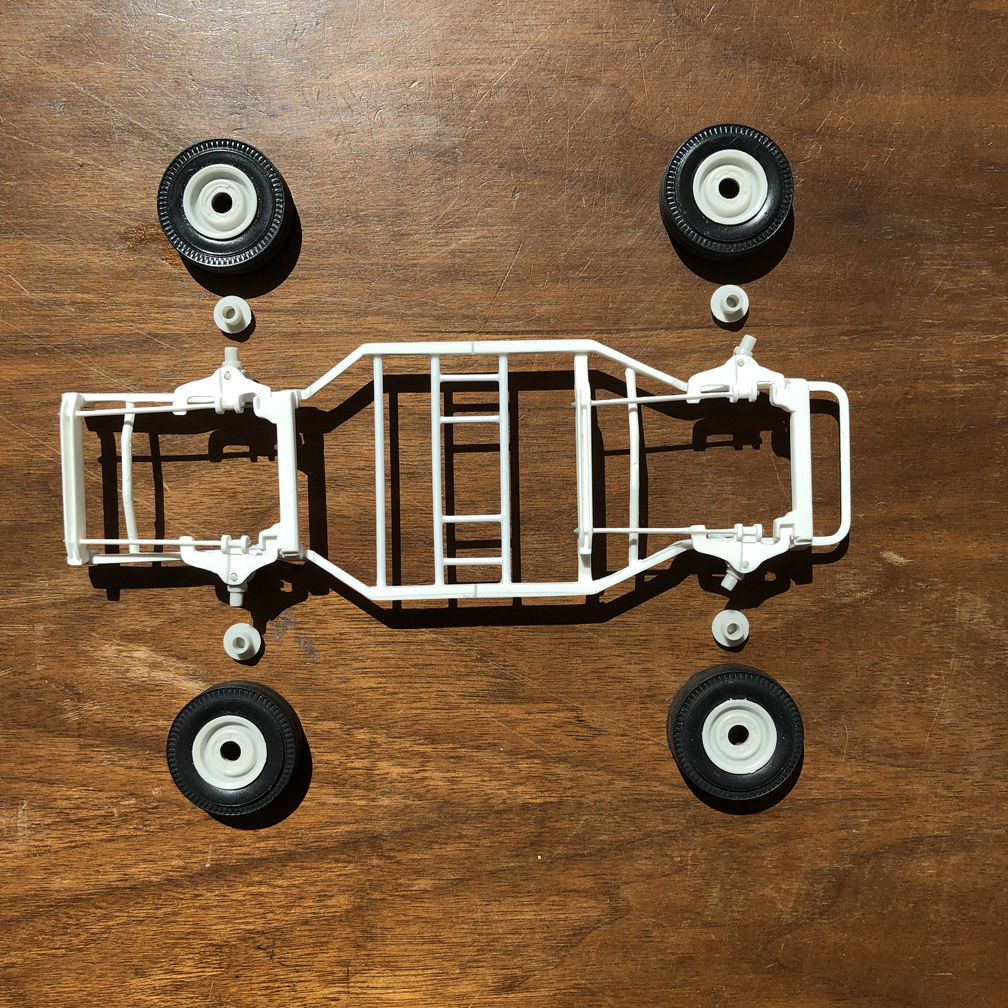
 Here's a layout of the tire/wheel combination I'm using.
The rear slicks on one of the sets of original Aurora Undertaker slicks protruded more than the reissue,
so I needed to add some 3/16 Evergreen plastic hollow round tube to make the front slicks even to the rear slicks.
I'll add the hollow round pieces to the spindles later.
 9/26/2022
Since I'm using the engines from the MPC Californian Toronado,
I removed the original motor mounts on the Monogram frame and used scrap pieces of plastic to make new motor mounts.
 9/30/2022
To make the engines more stable, I'm adding .030 x.060 strip to the timing covers (which is part of the motor mount).
I also needed to add a piece of .040x.040" strip to the frame rail where the timing cover rests on to raise the engine higher. (no photo of it).
 10/3/2022
Starting with the hood off, I marked where the blower would be (front to back) on the fenders first,
then I re-marked the lines when the hood was back on (without the engine in). The rear was done the same way basically.
I also used a Speed City Hilborn Bug Catcher and traced it out on the hood to make sure I had the opening correct.
As you can see on the hood, I made some mistakes, so I glued in some pieces of scrap plastic.
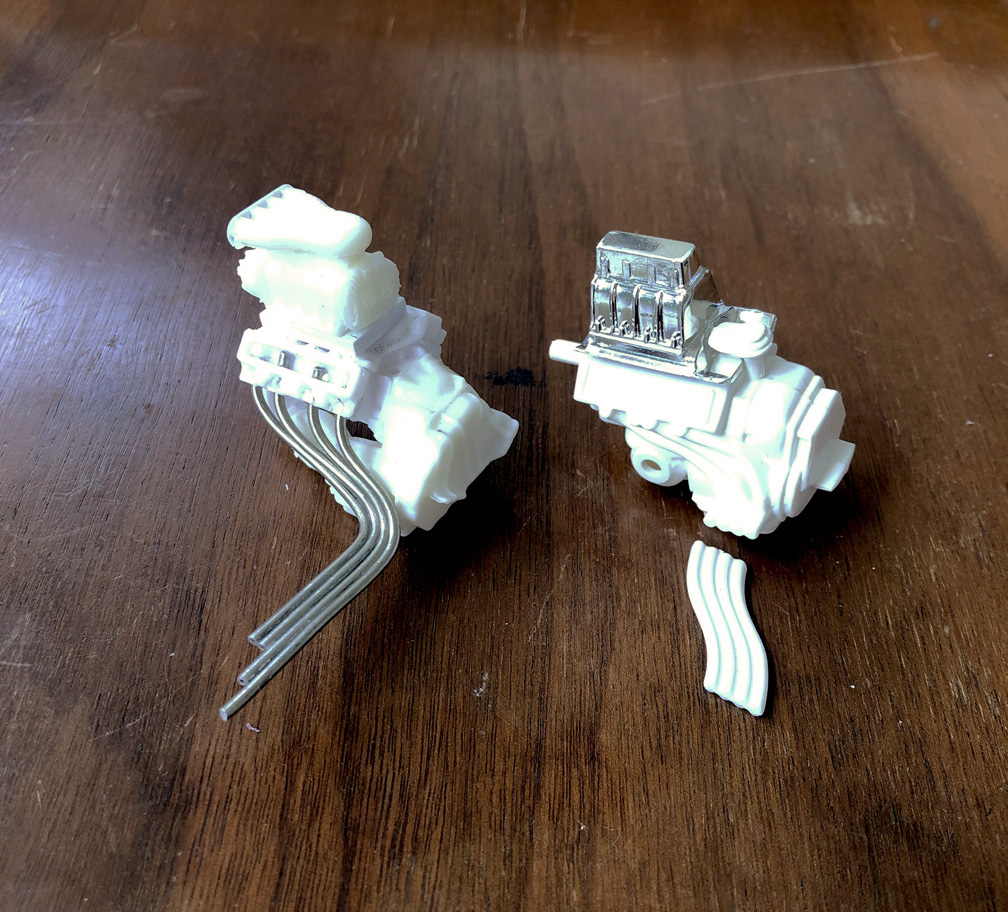 As you can see, headers made from solder are much more accurate than the Monogram Hairy Olds headers.
I will do a mini-article of how to make "headers from solder" below.
TO MAKE HEADERS FROM SOLDER
This is the fastest and easiest way to make solder headers.
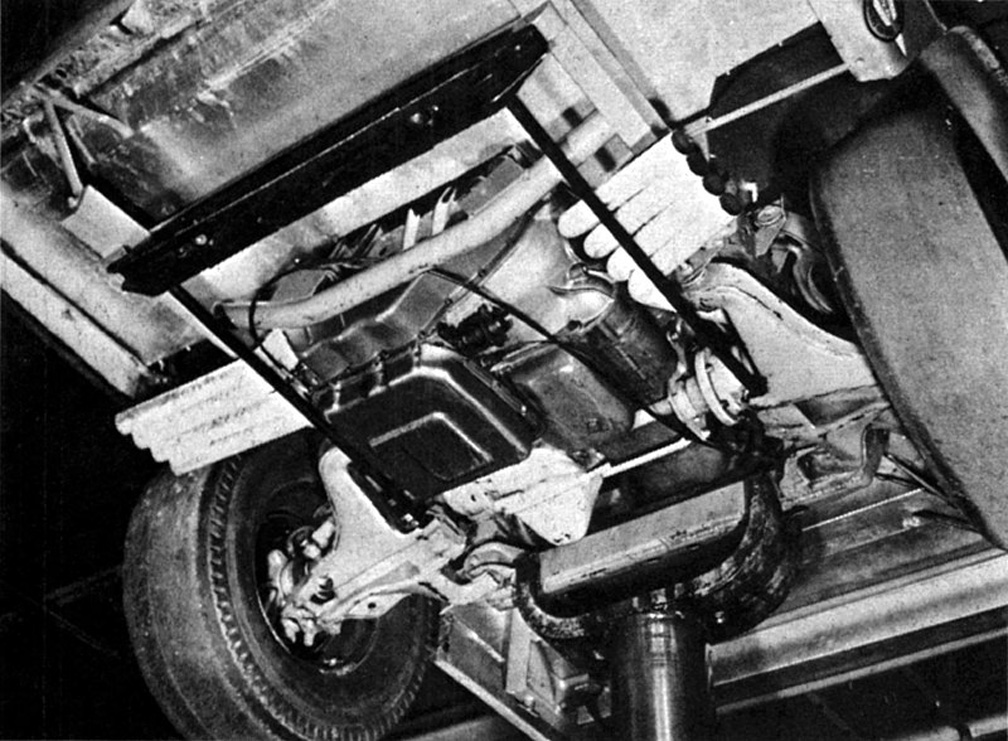
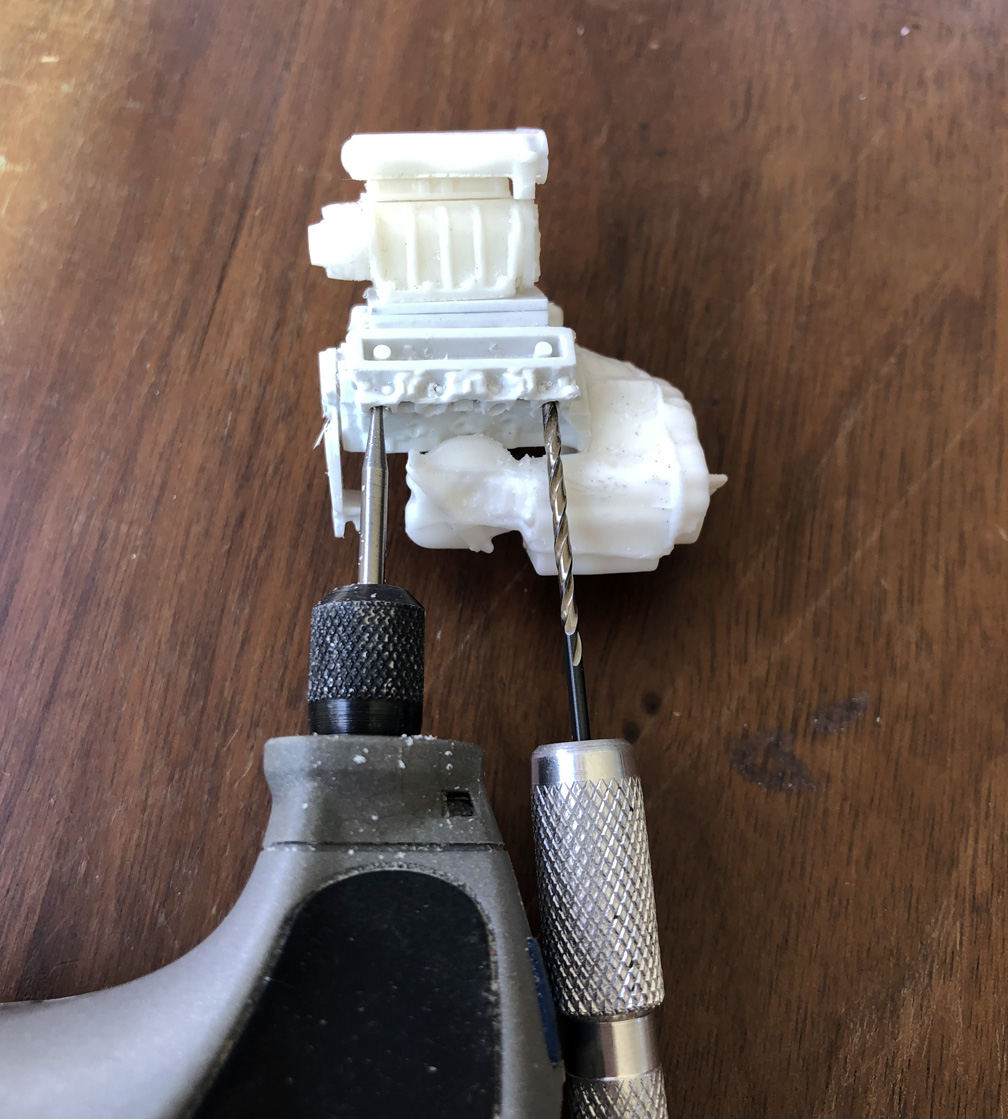
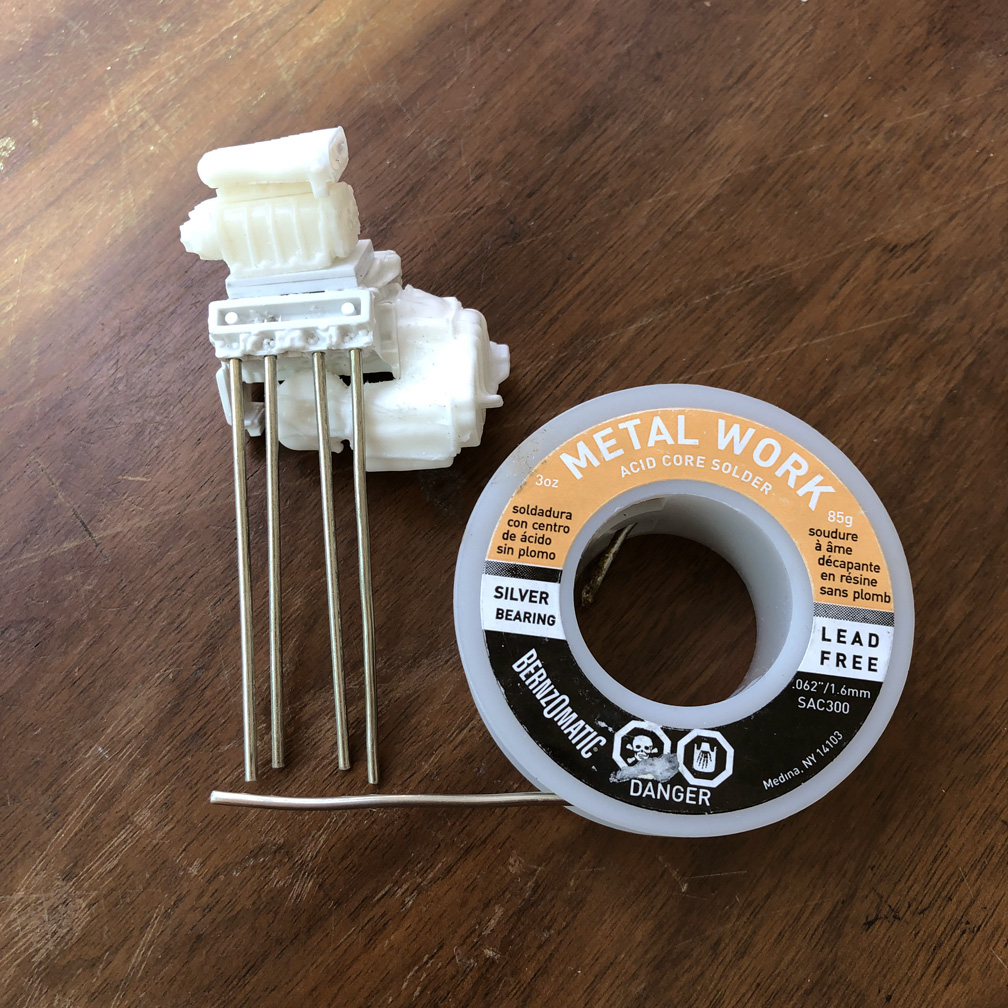

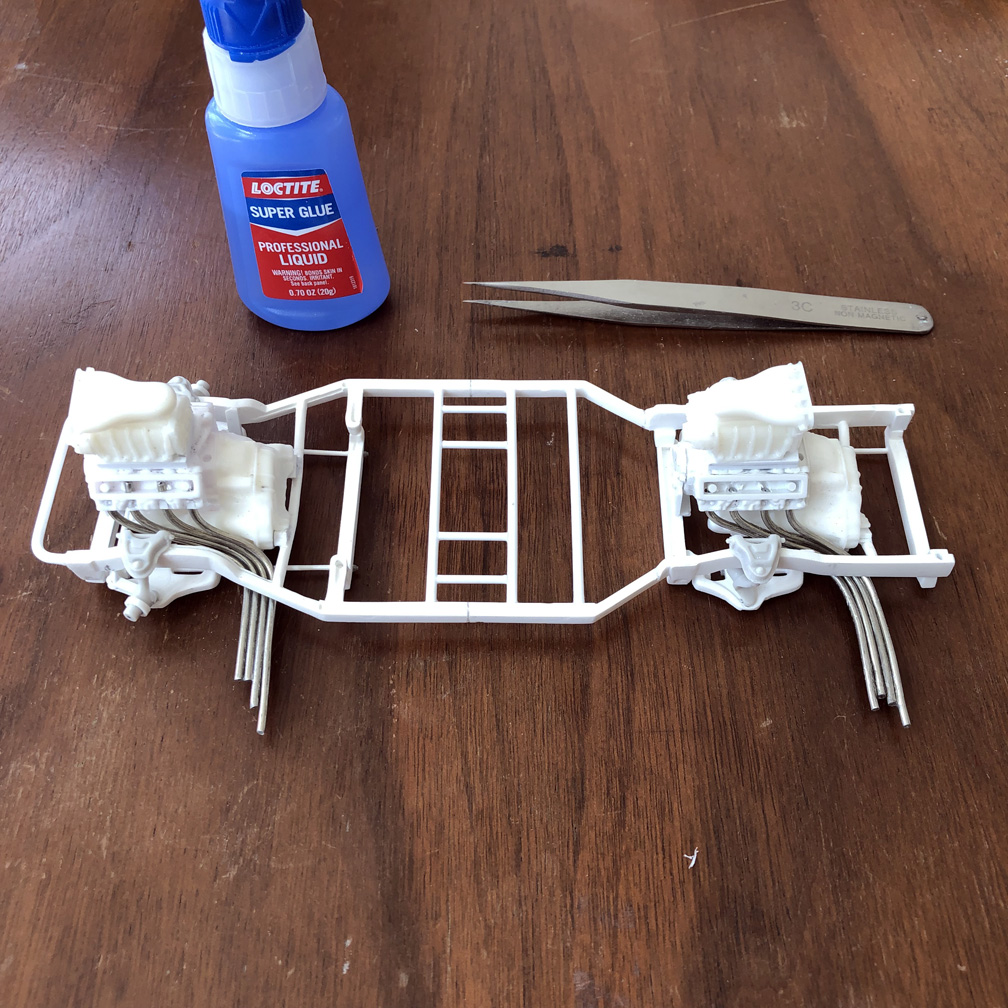
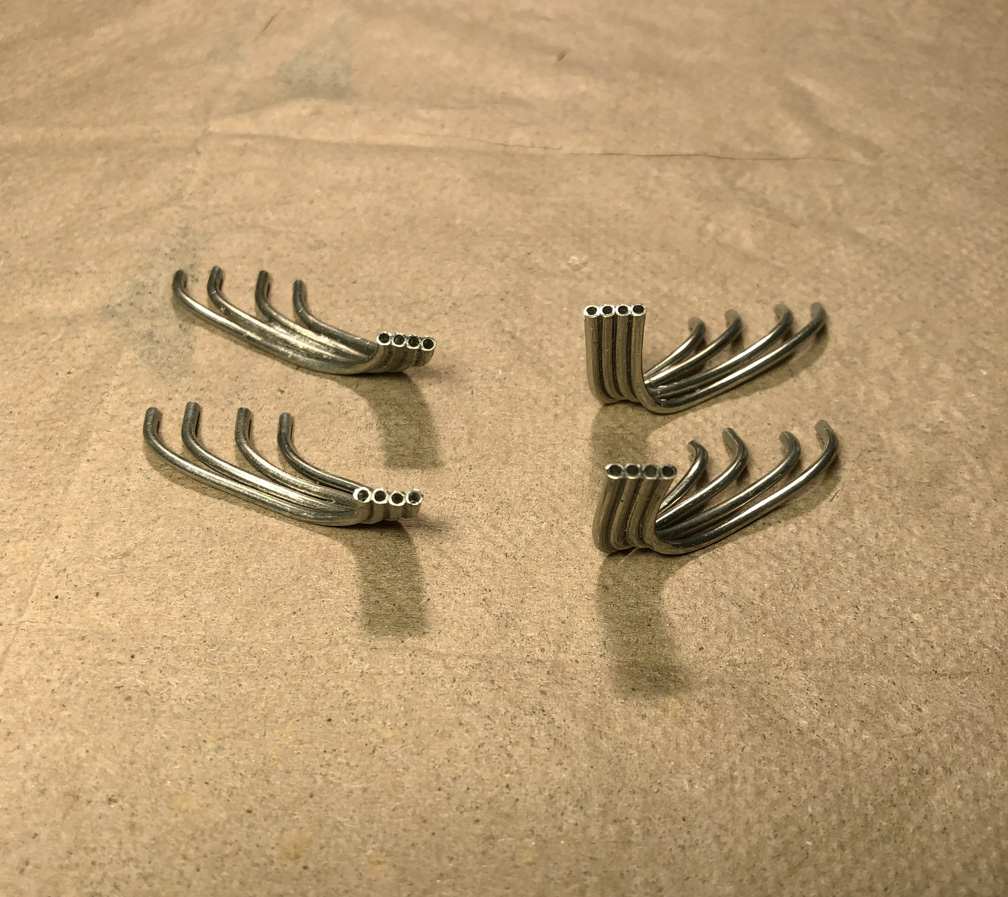
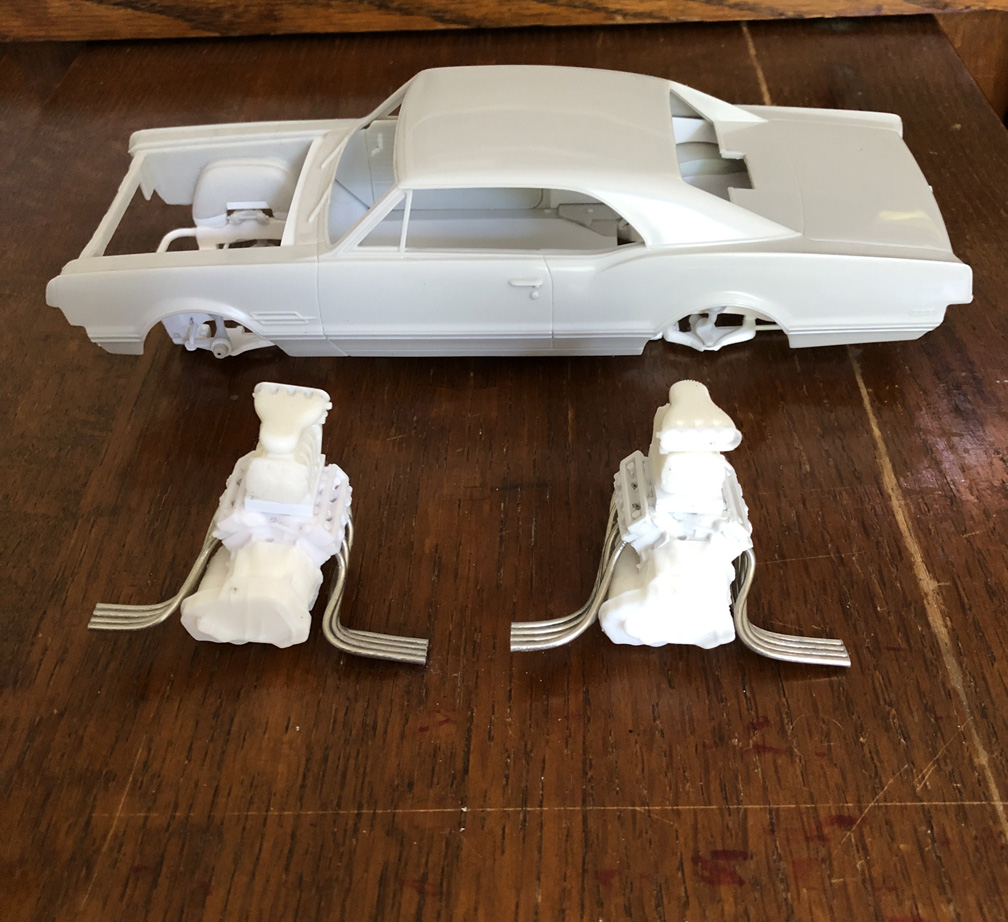
Photo 1. Using this reference photo, you can see these headers are not like the ones in the Monogram Hairy Olds kit.
They don't zig zag at the ends of the tubes, but go straight out.
Photo 2. Using a Dremel with a small bit, I pre-drilled all the pilot holes first. This was quick and saved a lot of time.
I then re-drilled the holes using a pin vise with a 1/16" bit that fits the solder tubes perfectly.
Photo 3.The Olds engine has smaller exhaust tubes, So I'm using the 3oz Lead Free Acid Core Solder .062" / 1.6mm.
Cut 4 pieces of solder about 3" long and insert them into the holes. Solder bends like butter, so this is extremely easy to do !
Photo 4. After bending all the tubes, I inserted the engine into the chassis and re-adjusted the tube ends to be straight.
Then Super Glued all the ends of the solder tubes. After the glue dried,
I re-adjusted the tubes and then,
put a bead of Super Glued between all the header tubes.
Photo 5. I made a 2nd set of headers the same way. I used tweezers through this process to make all the tubes straight and flat.
The other (right side) headers will be done the same way.
Photo 6. After finding where the header tubes need to stop, they were all cut with a hobby knife.
The hole ends were then drilled out using 3 different size drill bits.
Photo 7. These were very simple to make and will look so much nicer than the Monogram kit headers.
Hopefully, some of you to try this on your next build.
This took 5 days of build time, working 3-4 hours per day.
Back to the interior-
 I'll be using this photo as reference for the roll bars.
The roll bars will need to be made separate and NOT be glued to the frame like it is done on the real car for too many reasons to describe.
The roll bars will be added upon final assembly.
 10/12/2022
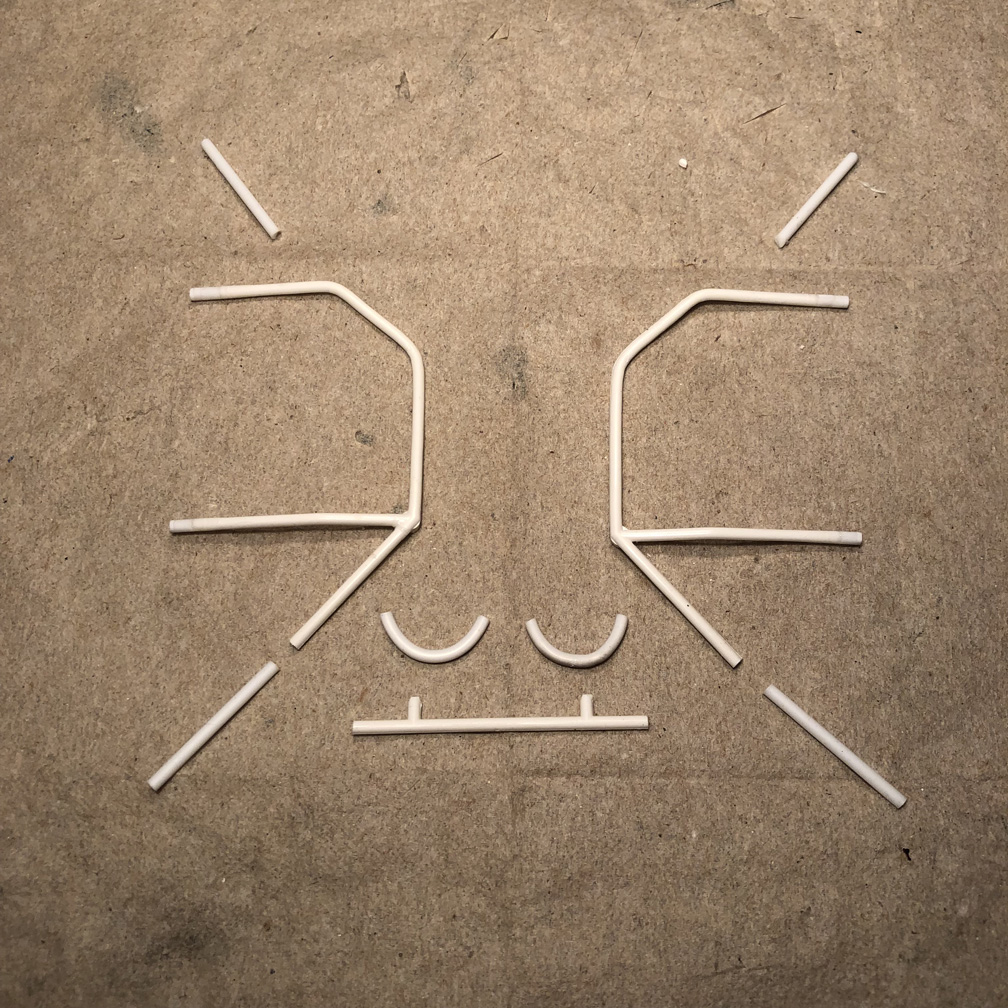
Using the roll bars from the Monogram kit, I started by bending the side bars to match the real car.
I cut off the straight head rests and made curved head rest's from .080" rod. I heated the curve to maintain the curved shape.
I drilled new pilot holes in the interior floor (not shown here) with a 5/64 drill bit. This will keep the roll bars in place as I make other changes.
Extension pieces needed to be added to the roll bars as they were too low.
5 mm pieces to the front and 4 mm pieces on the rear bars.
Down bars were added to the front that will connect to the frame during final assembly.
 10/16/2022
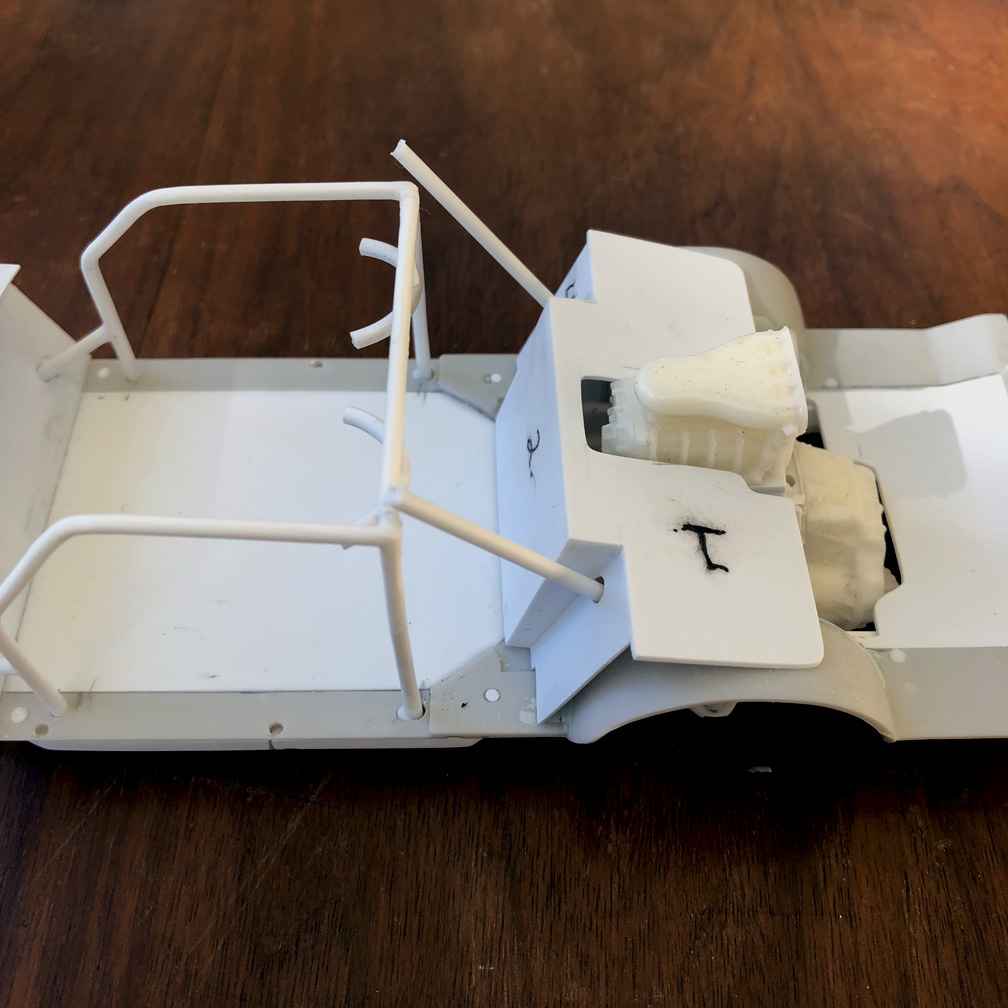
I first started the rear engine "Dog House Firewall" by using masking tape along the underside of the sail panels.
After tracing with a pencil, I removed the tape and transferred it to some .030" plastic sheet.
I measured were the engine would be and I used the hood to trace out where the engine would stick out.
The last step was to cut out the hole.
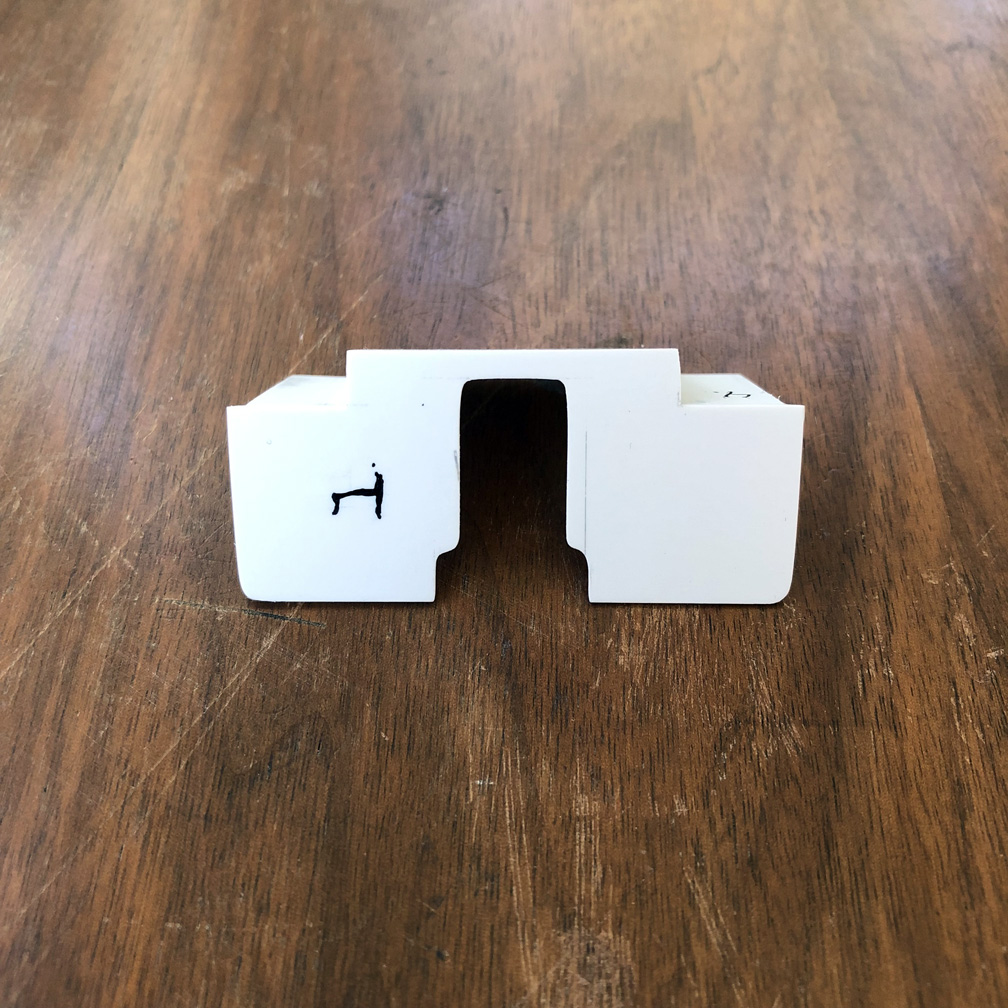
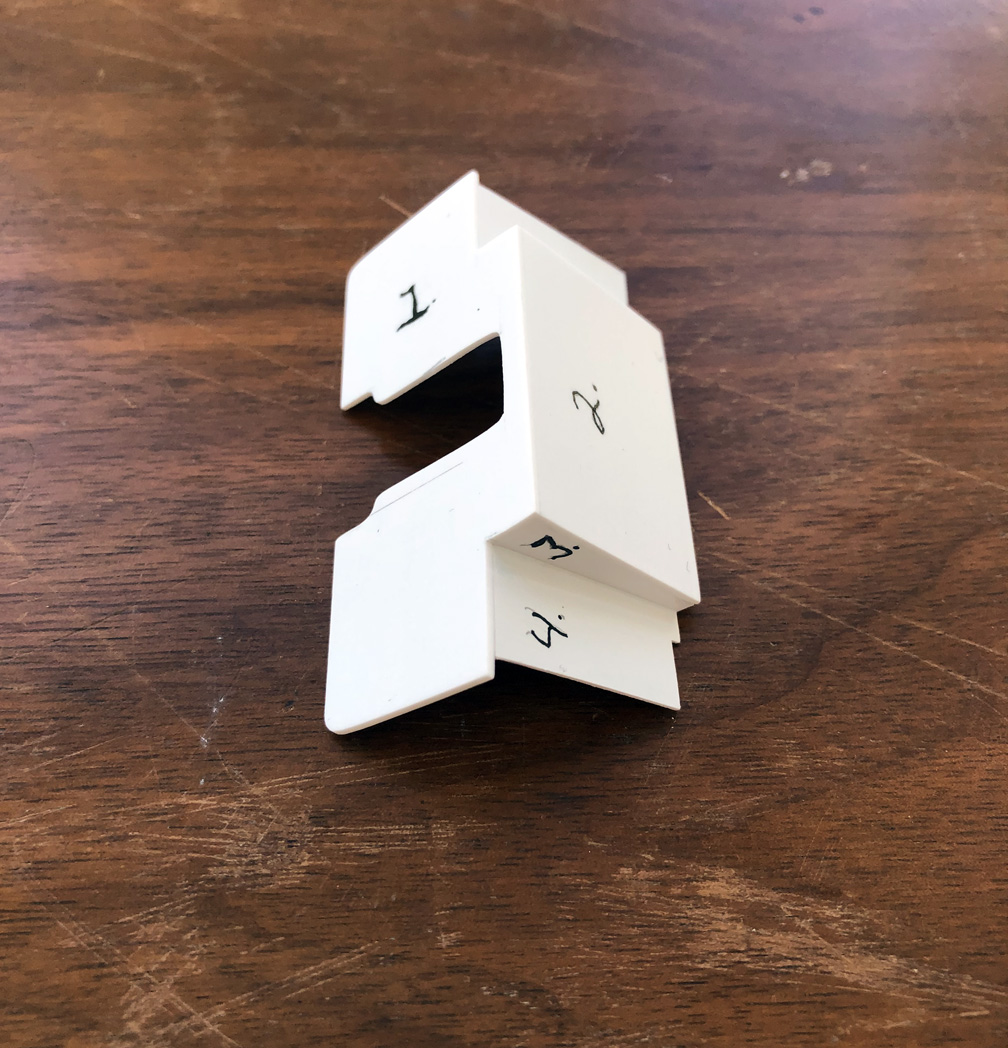 Use these numbered steps to take to make the rear firewall-
1. Top of the firewall needs to be kicked out in front to make room for the blower drive.
2. I measured where the top of the firewall would meet the floor. In my case it was 24 mm (or) 31/32" tall.
I then measured where the roll bars would by pass the firewall. In my case, it was 36 mm (or) 31/32" wide.
3. The side pieces were added but not really measured, I'll cut off the excess later.
4. These 2 side pieces were angled so the the hole in the floor would not show through.
 10/22/2022
This was the most frustrating part, trying to measure where the rear roll bars would have to poke through the rear firewall.
After finding the area where I would need to drill the holes, I used a small drill bit and used the drill bit to find the correct location.
I then used bigger bits to open the hole wider. The 2 bars will be added to the main roll bar upon final assembly
. 10/26/2022
I don't use kit glass anymore because I don't like the look of thick wavy, distorted glass, so I'll be using K&S .010" clear plastic sheet for window glass!
Because I'm not using the kit glass..... I had to add plastic strip along the front of the dash to fill the gap.
I also added some plastic strip to the face of the dash where all the radio and buttons were.
I cut out the console from the Monogram Hairy Olds and altered it by shortening, narrowing and reshaping it.
I'll be using Ken's Gold Fuzzy Fur on the floor, and I also want a driver figure too,
so I'll need to drill holes for the seats to hold the seat & driver figure securely to the floor.
I marked off in pencil where the round tube seats mounts are and drilled the holes for the seats.
You wont be able to see these holes, as the round tube seat mounts on the frame will hide them !
I'm working between the Speed City Driver Figure #2 and interior floor parts simultaneously-
using the steering wheel, console, Speed City Resin Gas Pedals & brake pedal to make sure all will fit later.
TO INSTALL A DRIVER FIGURE
Making a driver figure for your model car can sometimes be difficult and other times can be easy.
In this case I wanted to show you the difficult side of making a figure fit and changing his position !
I'll be working with a Speed City Resin "DRIVER FIGURE #2"
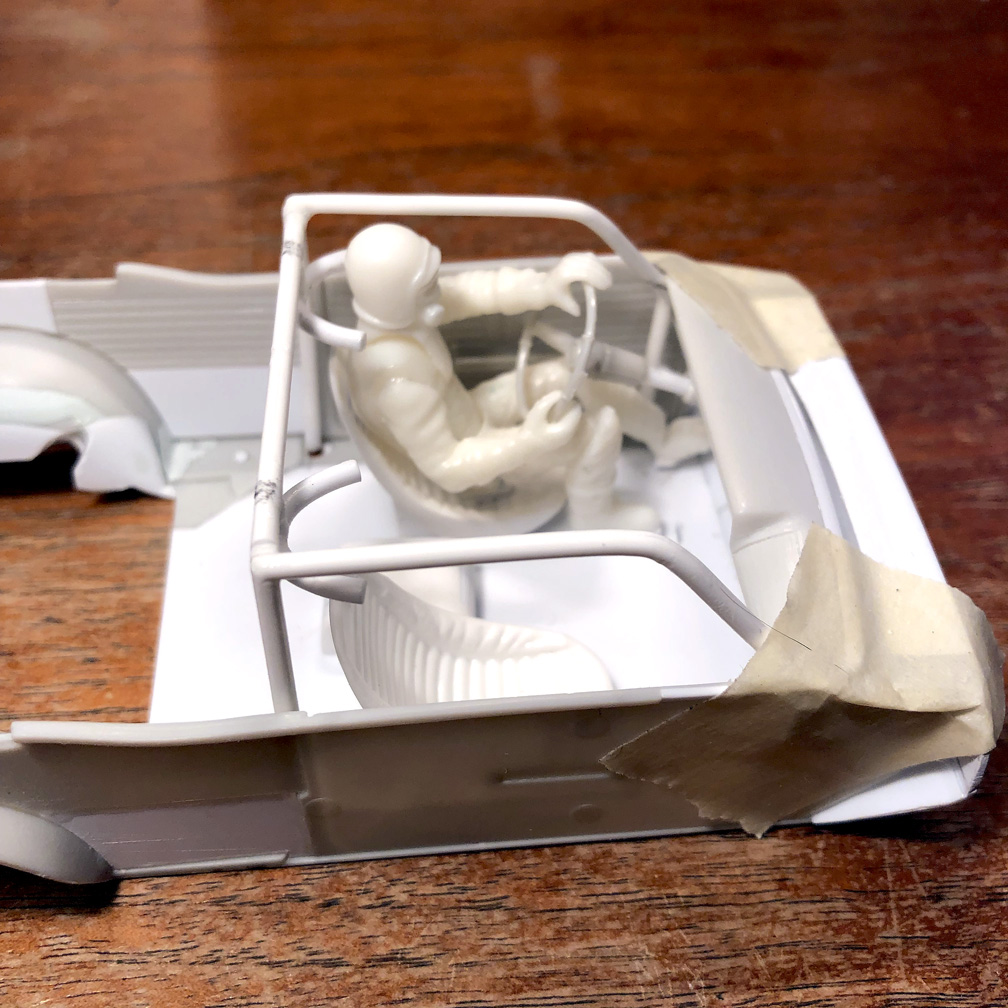

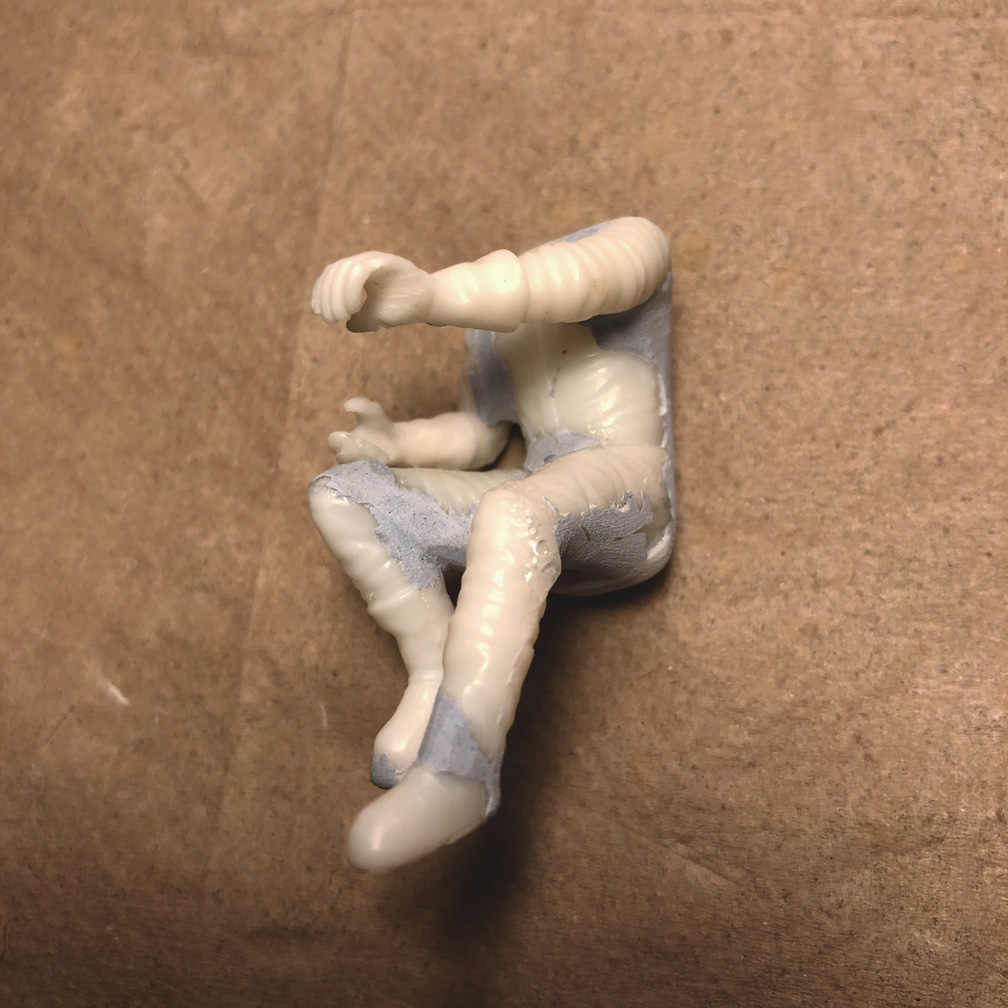

Photo 1. Always start by mocking up the interior tub with the dash, steering wheel & seat before you start the figure.
I like to install the roll bar too to make sure the height of the driver is correct.
Photo 2. I added some plastic pieces to the bottom of the figure to raise him up a little bit.
You can see all the cuts I made to the joints and re-positioned them using heat from a lighter and setting with super glue.
Use tweezers to align the arms. This is a very tedious step and can take a lot of patience.... Sometimes.
Photo 3. All the joints have been puttied and the excess putty has first been carved away with a razor knife.
I'll be using sandpaper, sanding sticks, scraping with a hobby knife and using a round jewelers file to clean up and make new wrinkles in the fire suit.
This took 5 days of build time, working 3-4 hours per day at this point.
Photo 4. Finished figure !
BODY WORK-
I usually start body work first as I usually need to make alterations such as moving wheel wells, etc.
But this model is different as it needs no major body alterations, so I'm doing the body mods last.
 10/31/2022
Before I start any body work, I need to cut out the trunk lid, I need to reinforce the rear valance area with plastic strip.
I removed the original tabs on the AMT trunk floor that slip into the sq. holes behind the bumper.
The trunk floor will now rest on the plastic strip I added. I'm also adding some plastic sheet to the sides behind the bumper.
11/1/22
Starting to cut out the trunk.
TO CUT OUT A HOOD OR TRUNK
Many resin & plastic models don't come with separate hoods or trunk.
Here I'll show you the cleanest way to cut out and make a recessed gutter.
This model doesn't have hinges, only deck pins.

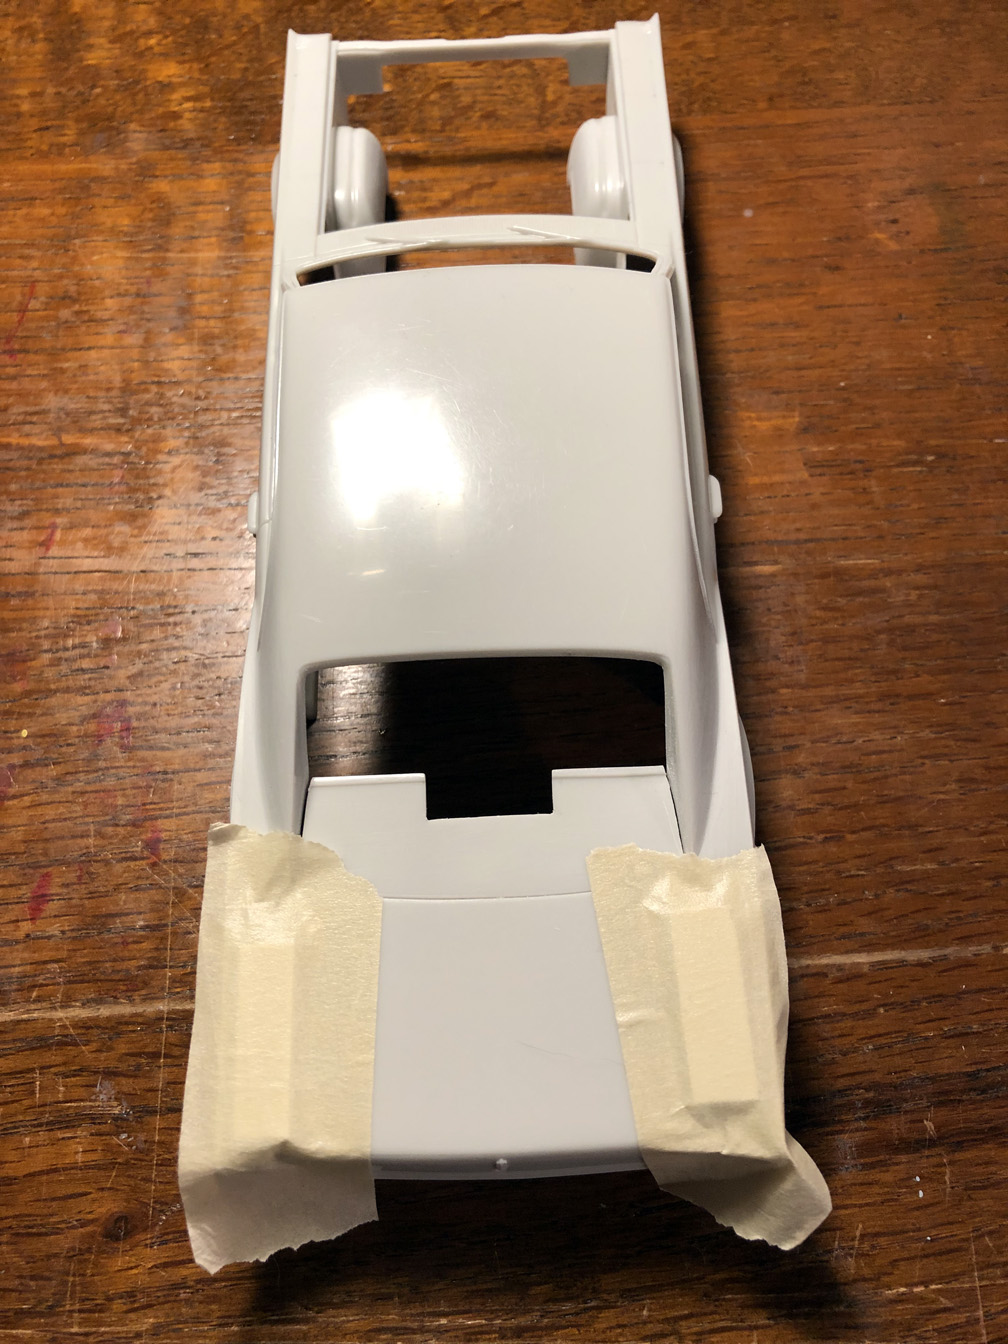

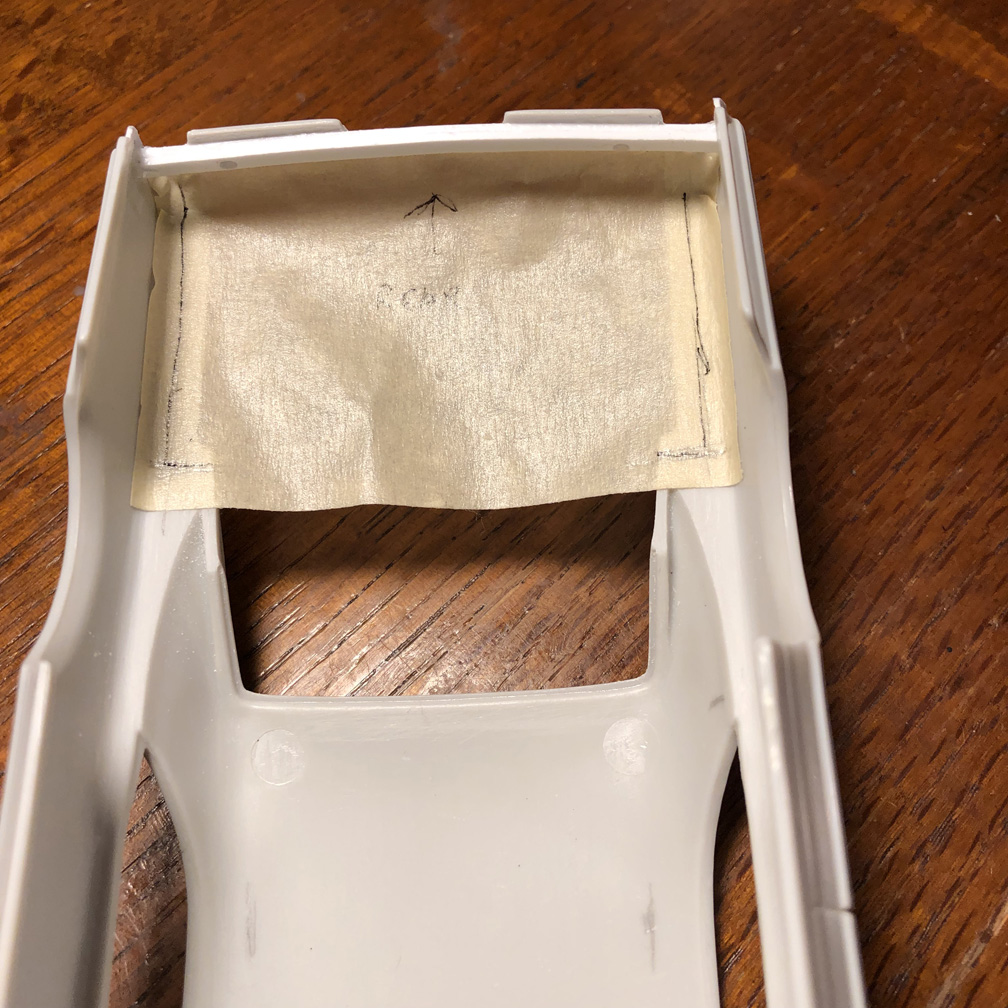


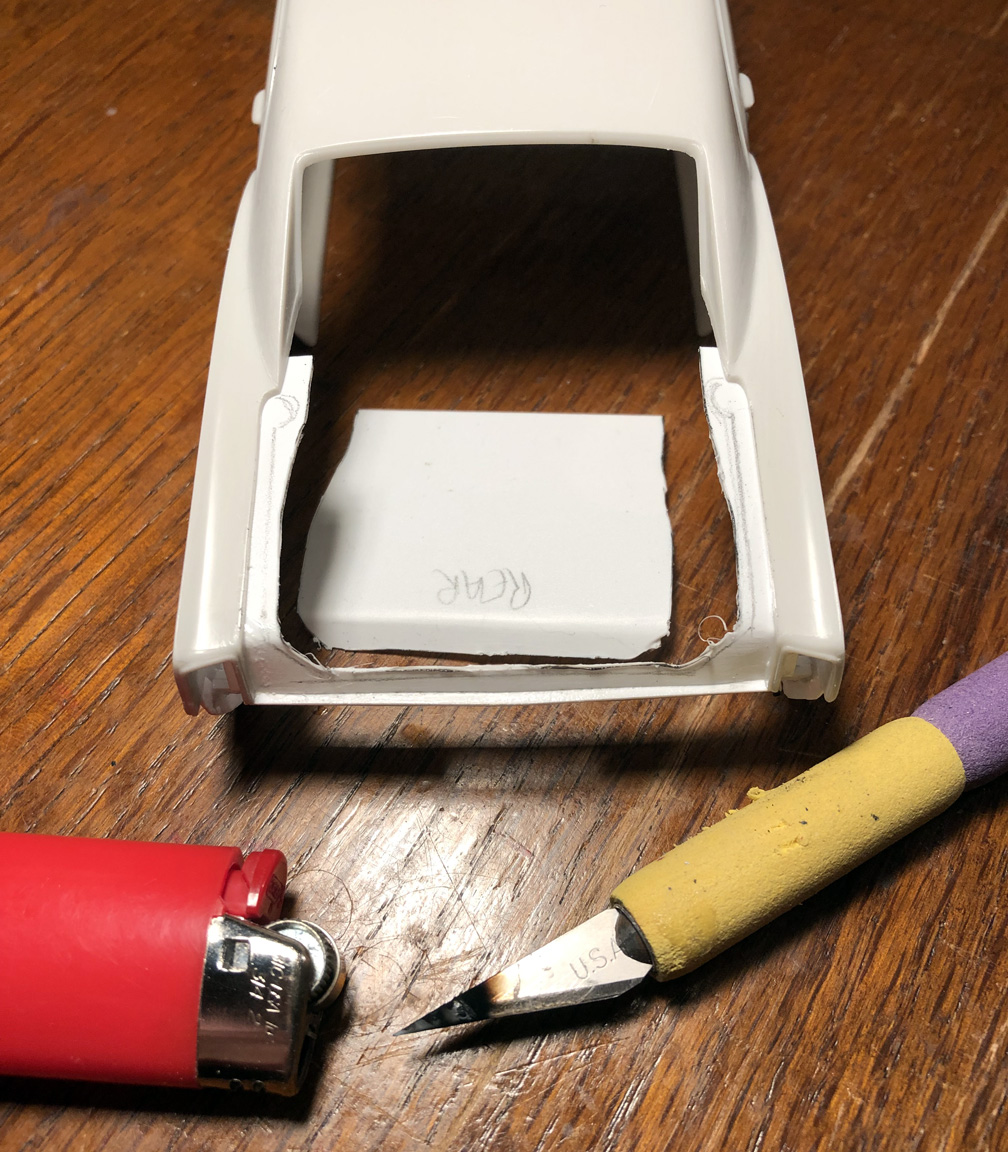
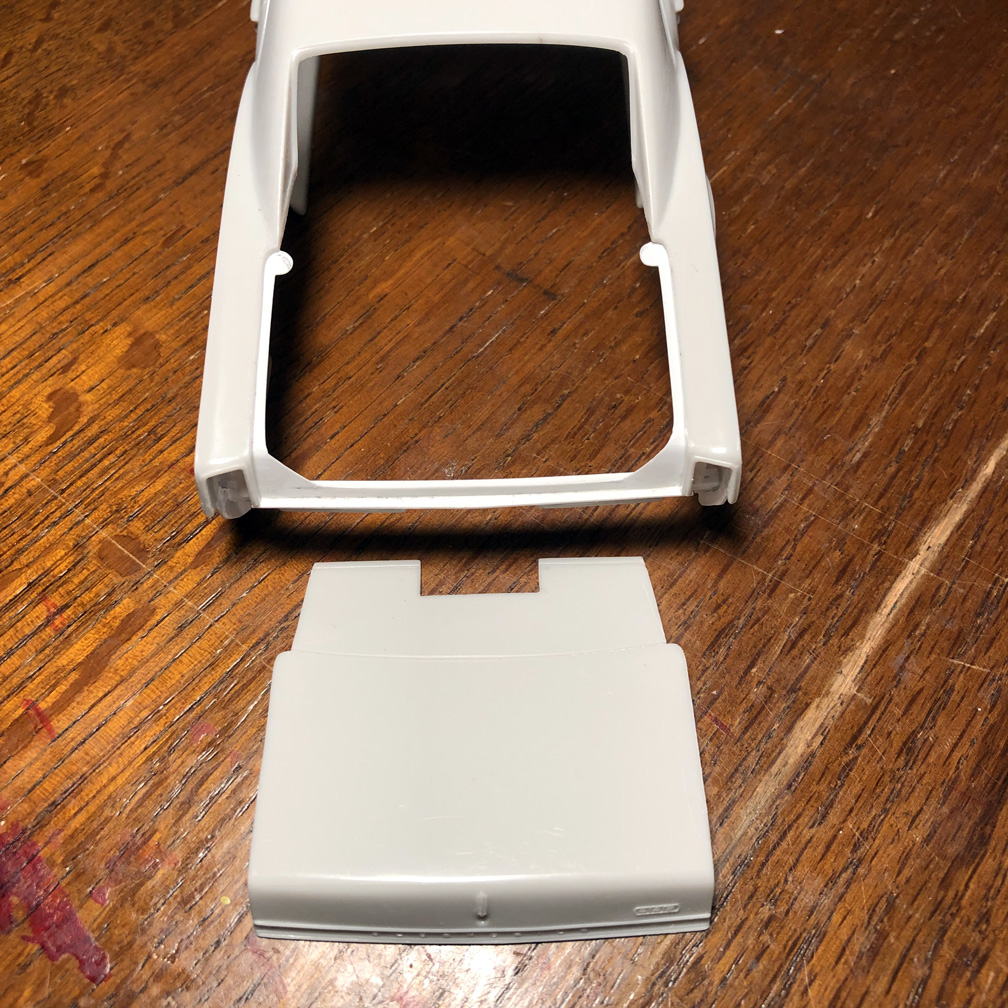
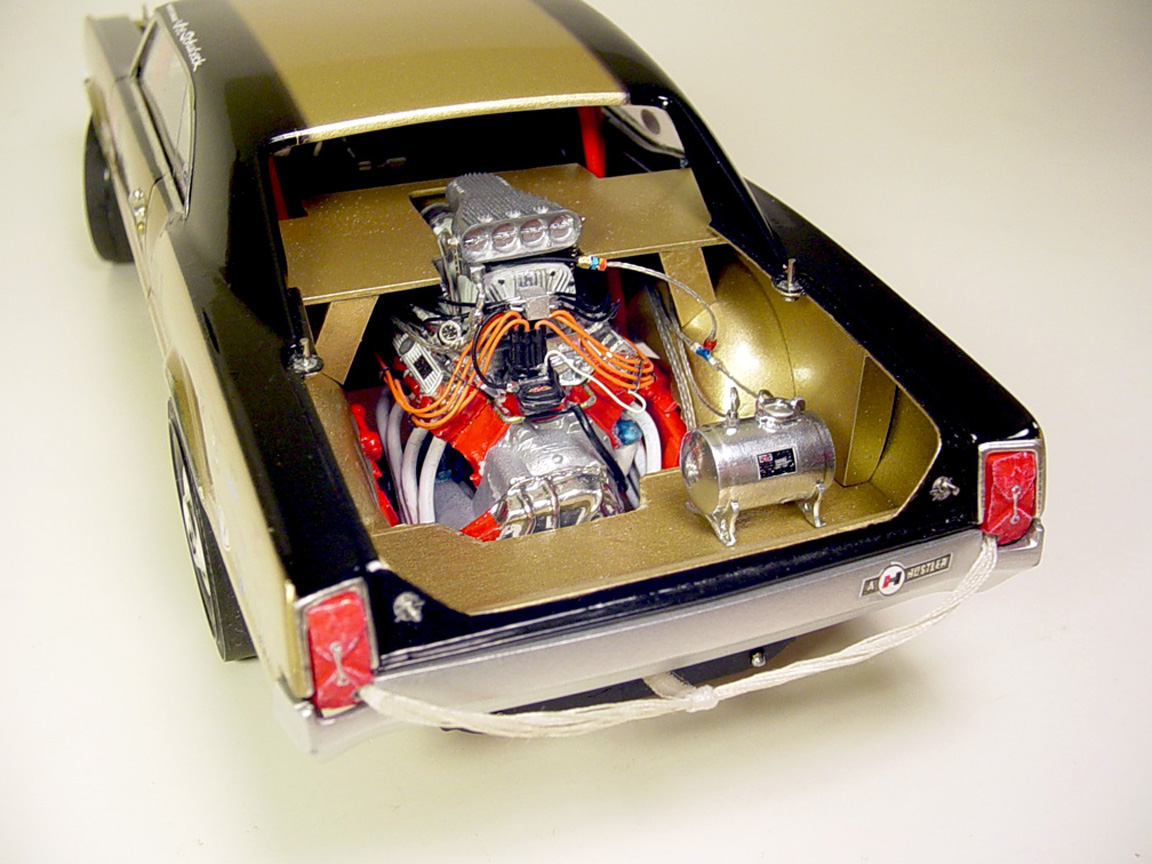
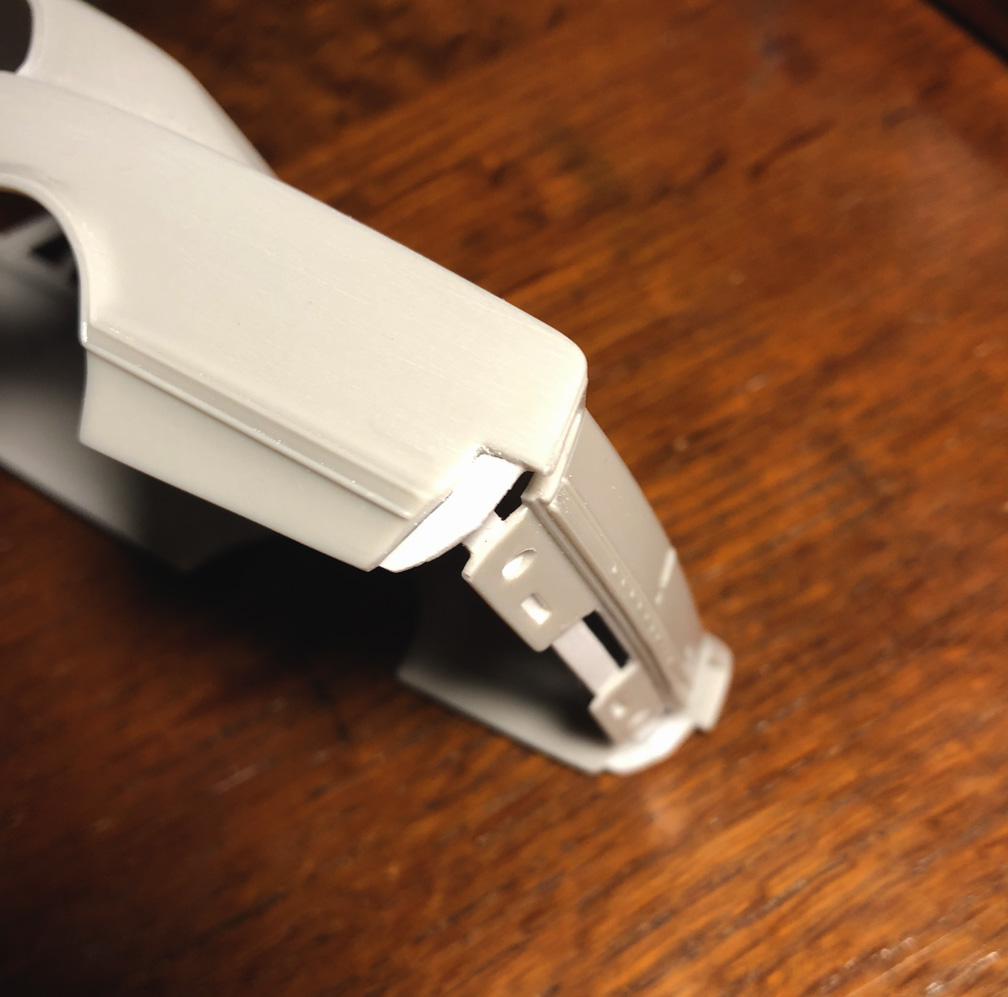
Photo 1. Before removing the trunk lid, start by sanding down the inside of the trunk lid and fenders to get it thinner.
I used the back side of the hobby knife to scribe out the trunk lid. This is a slow process, but I can make sure that I get a perfect cut.
Photo 2. Two pieces of plastic strip is put over the seem between the trunk lid and the fenders.
Now I can sand the back side of the fenders even with the thinned trunk lid.
Photo 3. The inner fenders were sand down even to the thickness of the trunk lid with sand paper and sanding sticks.
Photo 4. After sanding the trunk lid and fenders evenly, I use masking tape and draw were the I need to add plastic.
Photo 5. Remove the tape from the trunk and transfer it to some plastic sheet.
In this case it curves down so I want the sheet to be thin. I'm using .010" sheet.
Photo 6. Use liquid cement to install the plastic sheet to the inside of the trunk. Let dry overnight.
Photo 7. Use a lighter or small candle to heat up an old #11. X-acto blade. Slowly cut/melt along side the pencil line.
Photo 8. Now use a fresh new #11. X-acto blade to cut close to your line and clean up edges with a small sanding stick.
This took 3 days of build time, working 3-5 hours per day.
Photo 8. After drilling holes for the stick pins, I added Speed City inner hood pin decals.
 11/8/2022
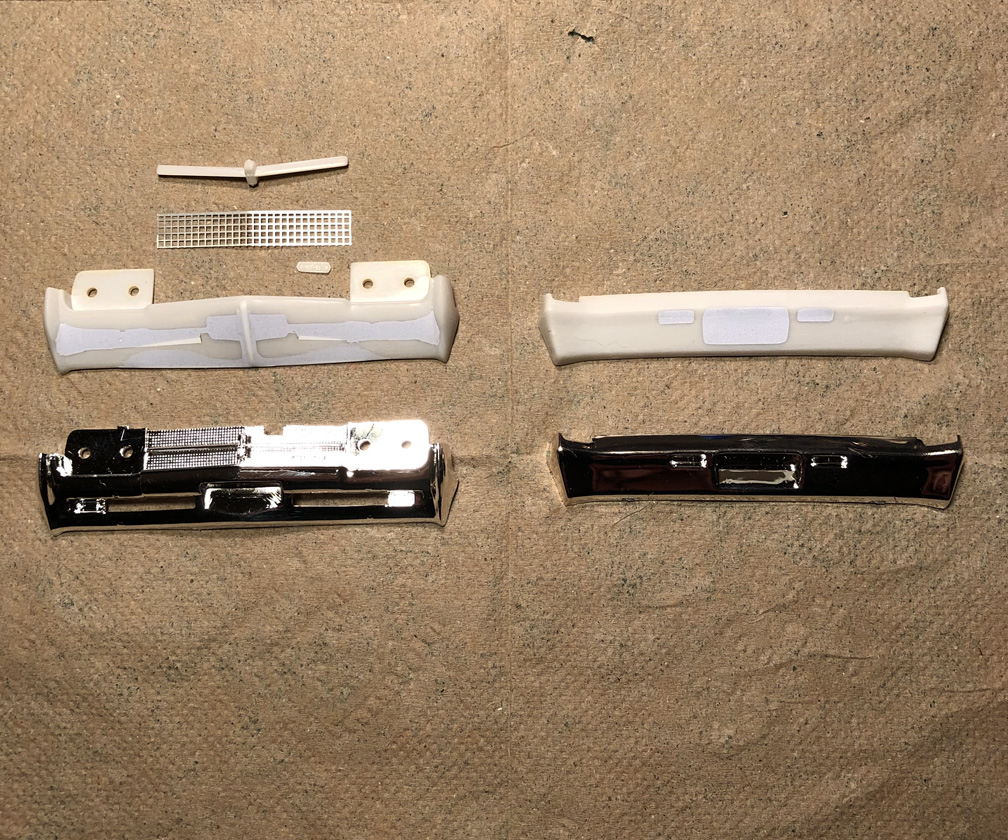
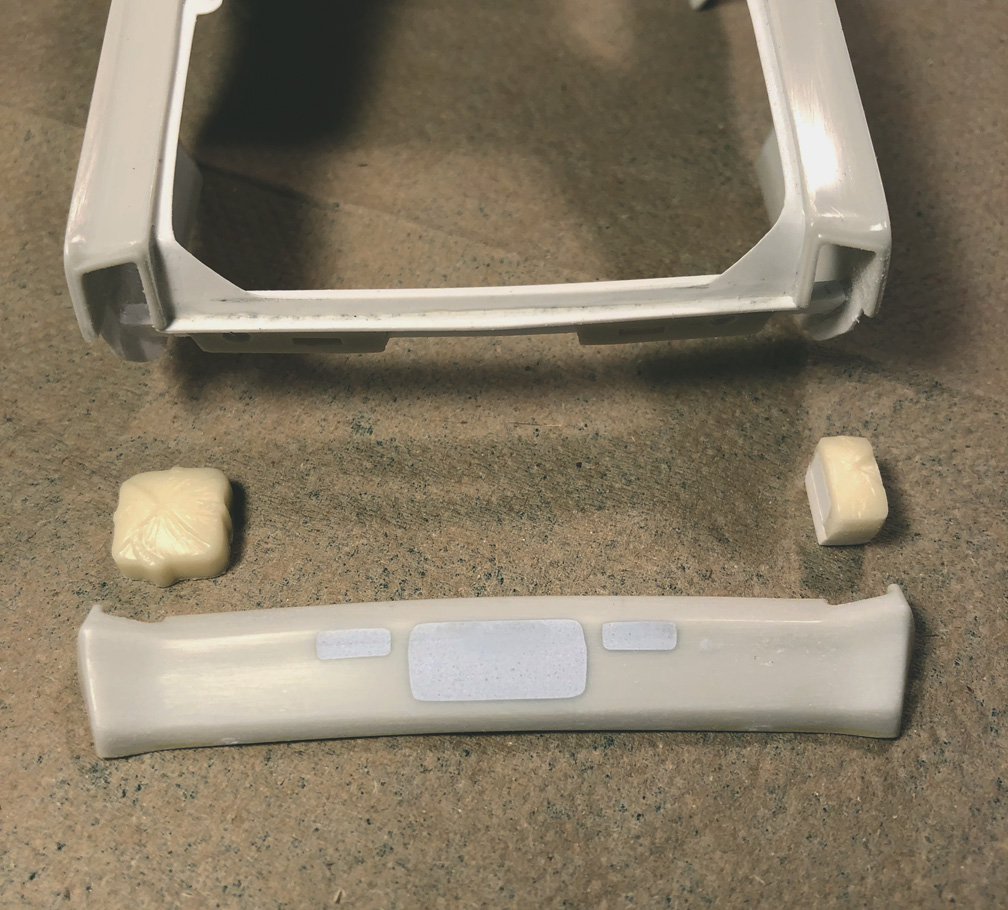
The bumpers were de-chromed using Easy-Off. Holes on the front bumper were filled in with .020 x .060 plastic strip.
.040 sq. strip was added to the bottom of the front bumper to give it a V shape. Putty filled in all the front & rear bumper holes.
A piece of .060" half round was added to the center of the bumper and back filled with putty.
The center of the grill was cut out and the cross bar was saved, as well as the 442 emblem.
The Photo-etch screen was given to me by a friend and was from a Studio 27 unknown Formula 1 car?
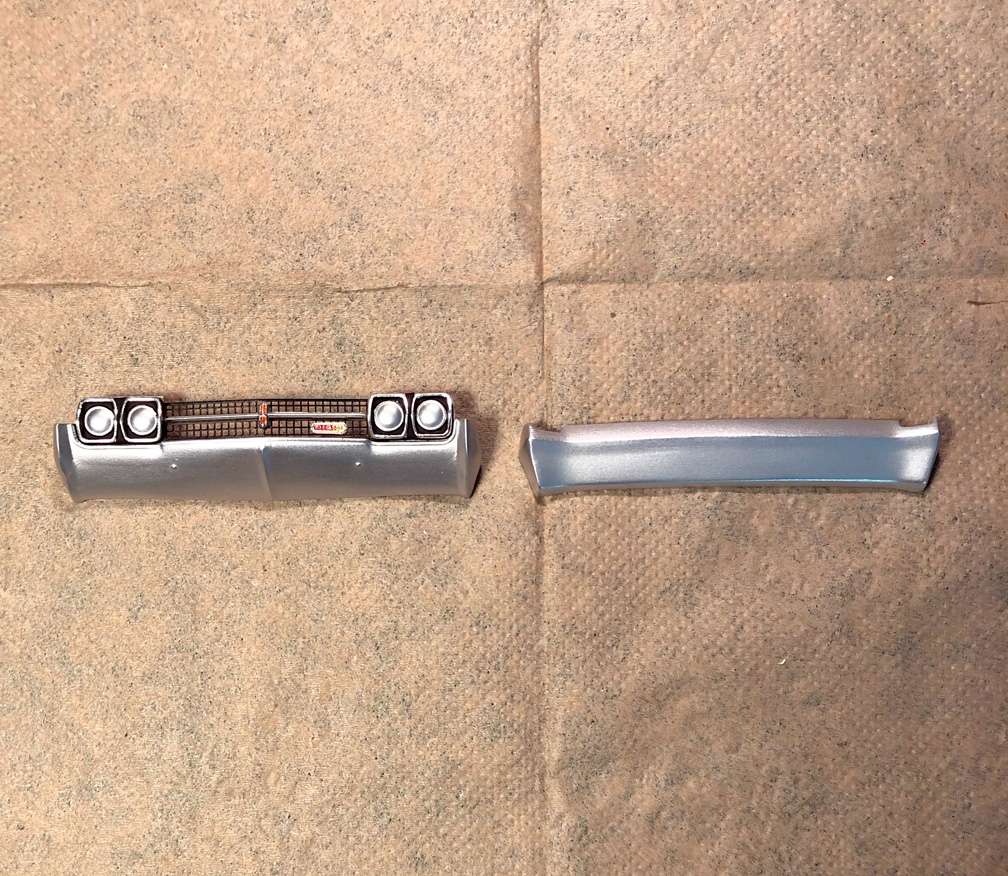 Finished pieces !
 11/10/2022
Starting with 2 Speed City parachutes, the sides were cut off to fit in the tail light holes.
One side was filled in with sheet plastic and the back was glued to a .080" sheet and re-shaped to make the parachute thicker.
Only the right side parachute is finished here.
 11/12/2022
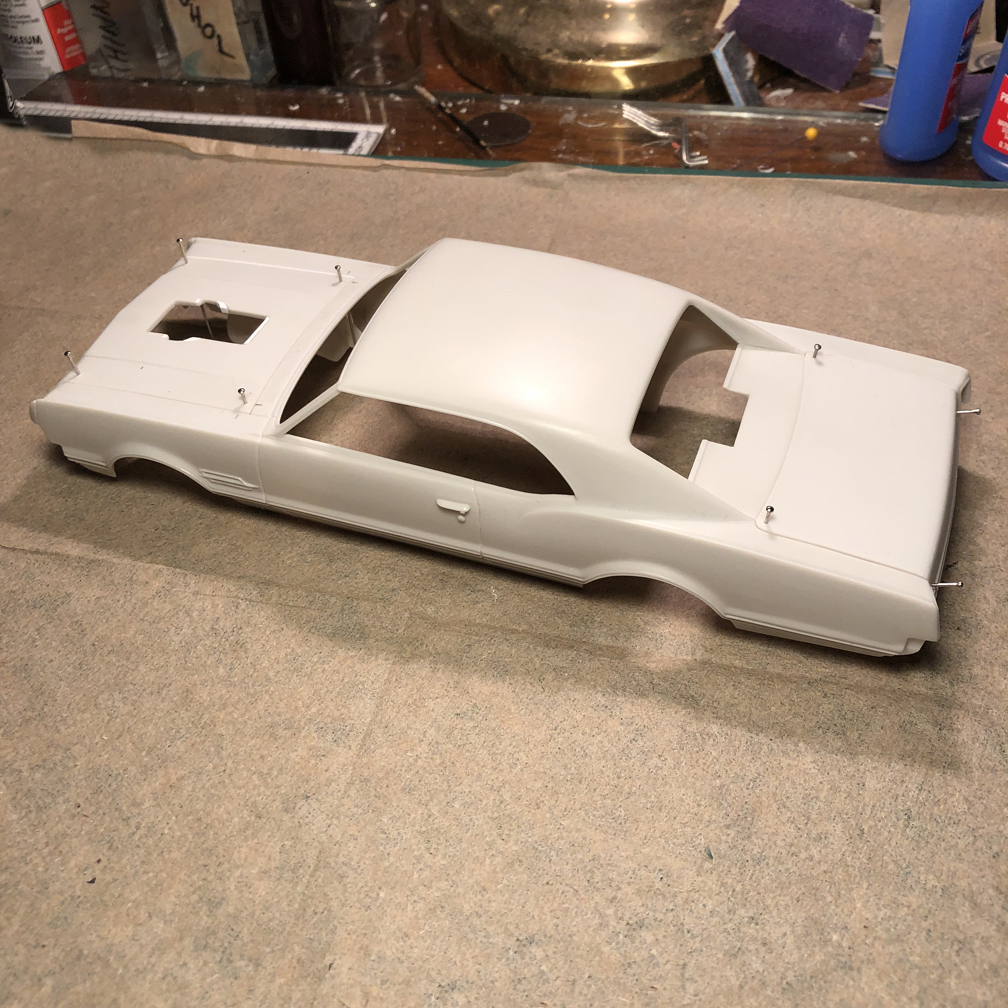
Here is the stock untouched body (on top) compared to the reworked body (below).
- The vent window trim was removed.
- The windshield wipers removed.
- Cowl vents were filled with super glue.
- New lines were cut for the window trim under the wiper blades.
- V shaped filler pieces were added to the fender wells.
- Radiator cowl structure was removed.
- Defects on the fender tips were filled and new head light cowl lines were re-cut.
- Hood hinge supports were made from the #40 rear end pieces from the AMT '66 Olds kit.
- A plastic strip was added the the right side of the hood.
11/13/2022...... Taking a break from this project to start the "TERRIFYING TORONADO".
 1/15/2023
Getting back to this project, I drilled through the trunk support and added some plastic strip to the hood area.
I drilled 8 hood pin holes using
a #69 drill bit and added the stick pins. The pins will be cut upon final build.
 1/16/ 2023
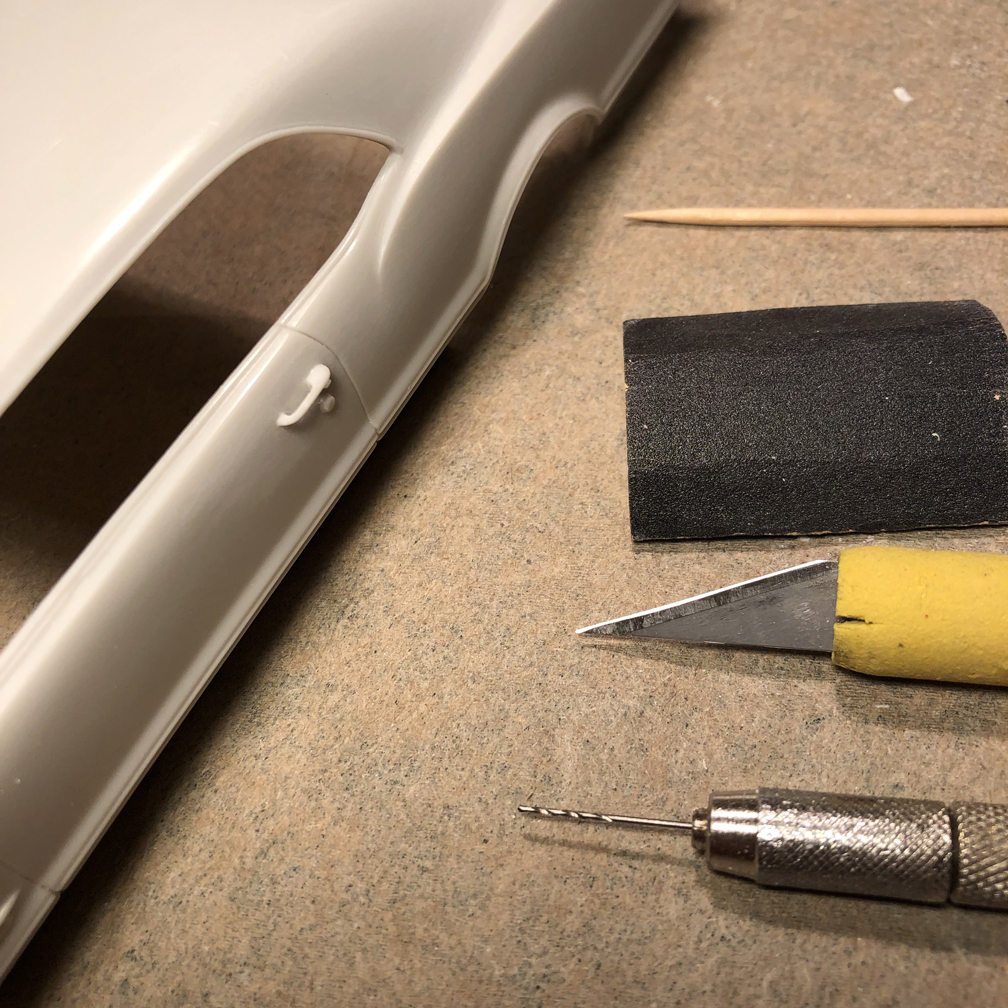
To open the door handles I used a #73 drill bit, drilled 3 holes, then slowly carving away at the inside of the handels,
then sandpaper and a tooth pick to smooth it all out.
1/21/2023 ...... Taking another break from this model build to get the decal artwork finished, printed, proofed and put into production.
1/31/2023
It cost us $100.00 to make the art work and create a decal file.
This decal is being printed by another company at a cost of $6.50 per decal..... So, there's not a lot of profit to be made here.
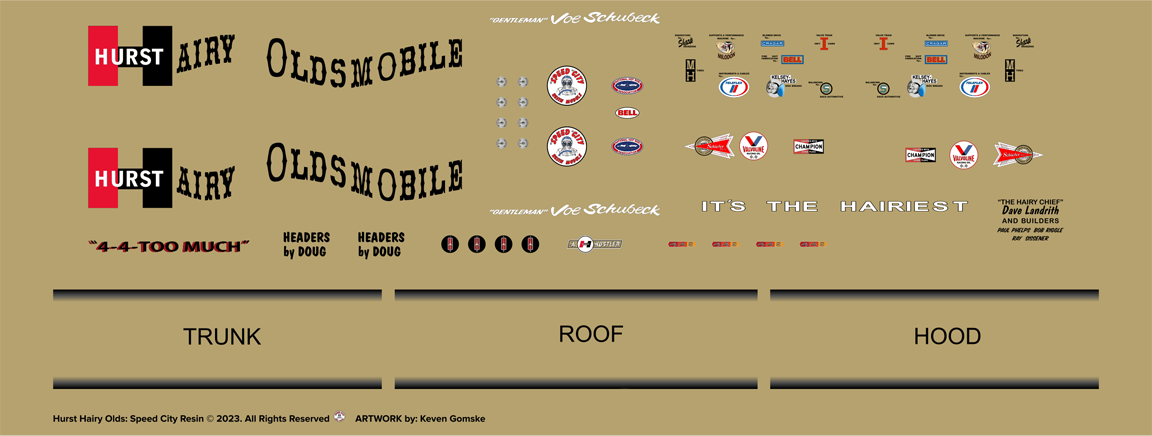
Decal is on the "PARTS" page in the "MISC." category under "DECALS"
The decal artwork was started on 7/28/2022.
They were finally finished, printed and shipped to me on 2/19/2023.
Approximately 7 months of back and forth with measurements,
design details and many emails and phone calls went into this decal.
TO MAKE WINDOW GLASS
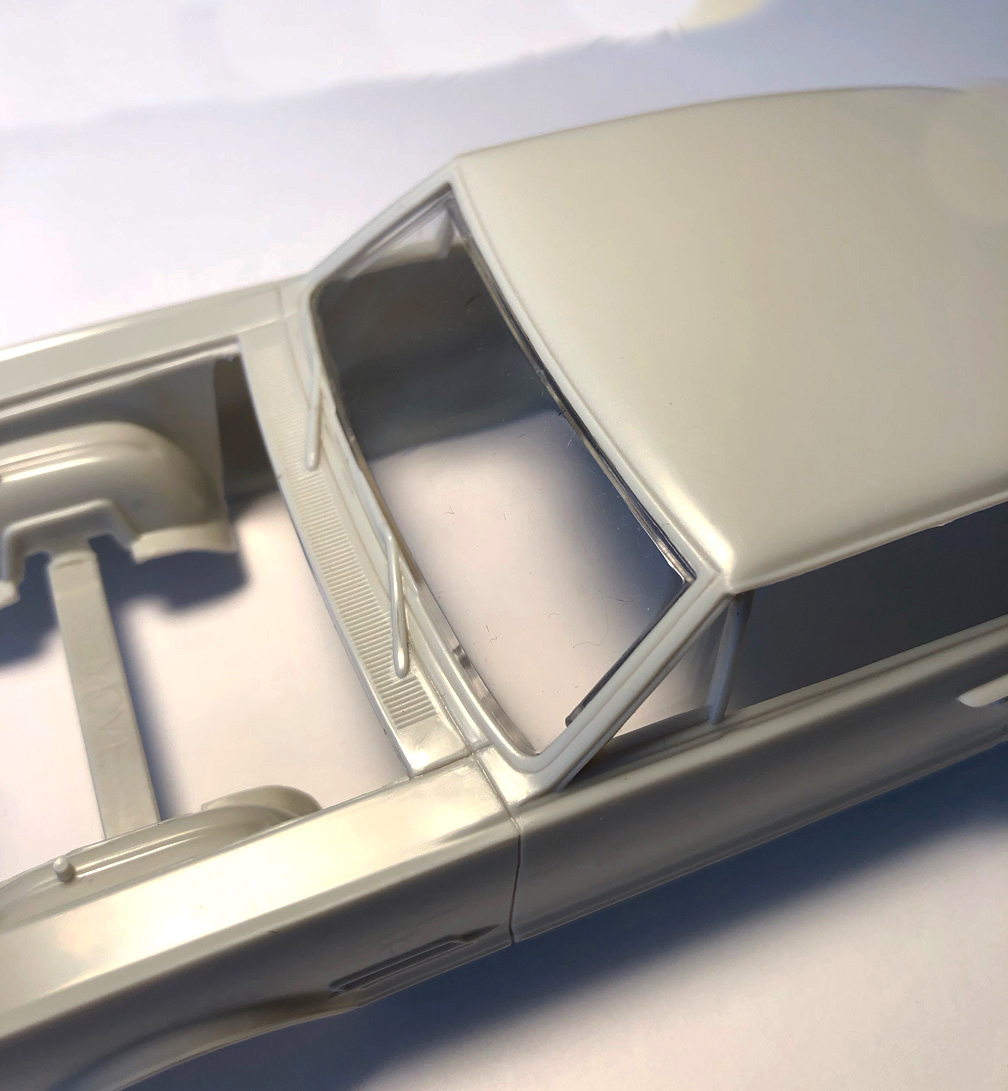
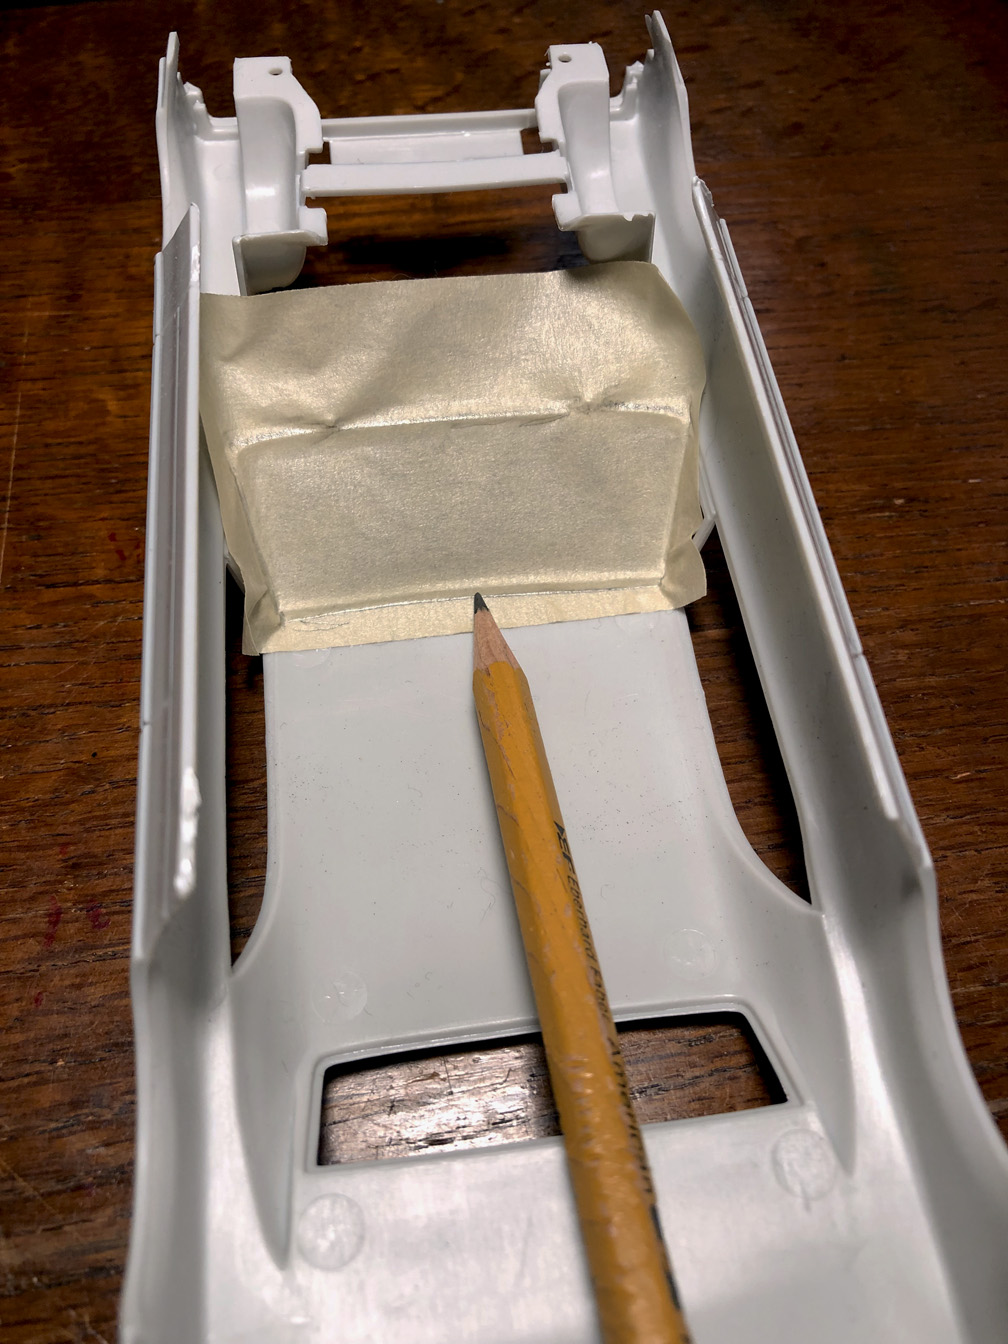
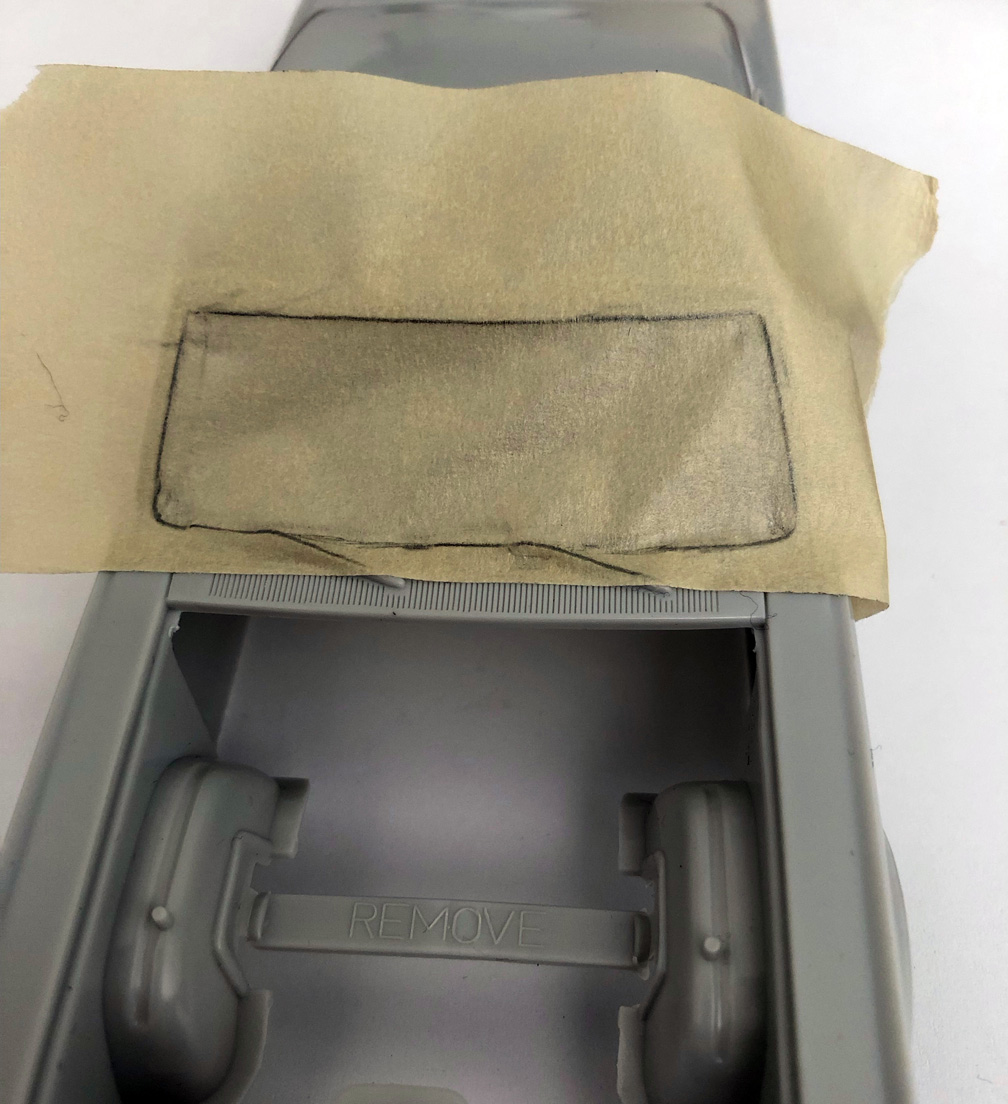
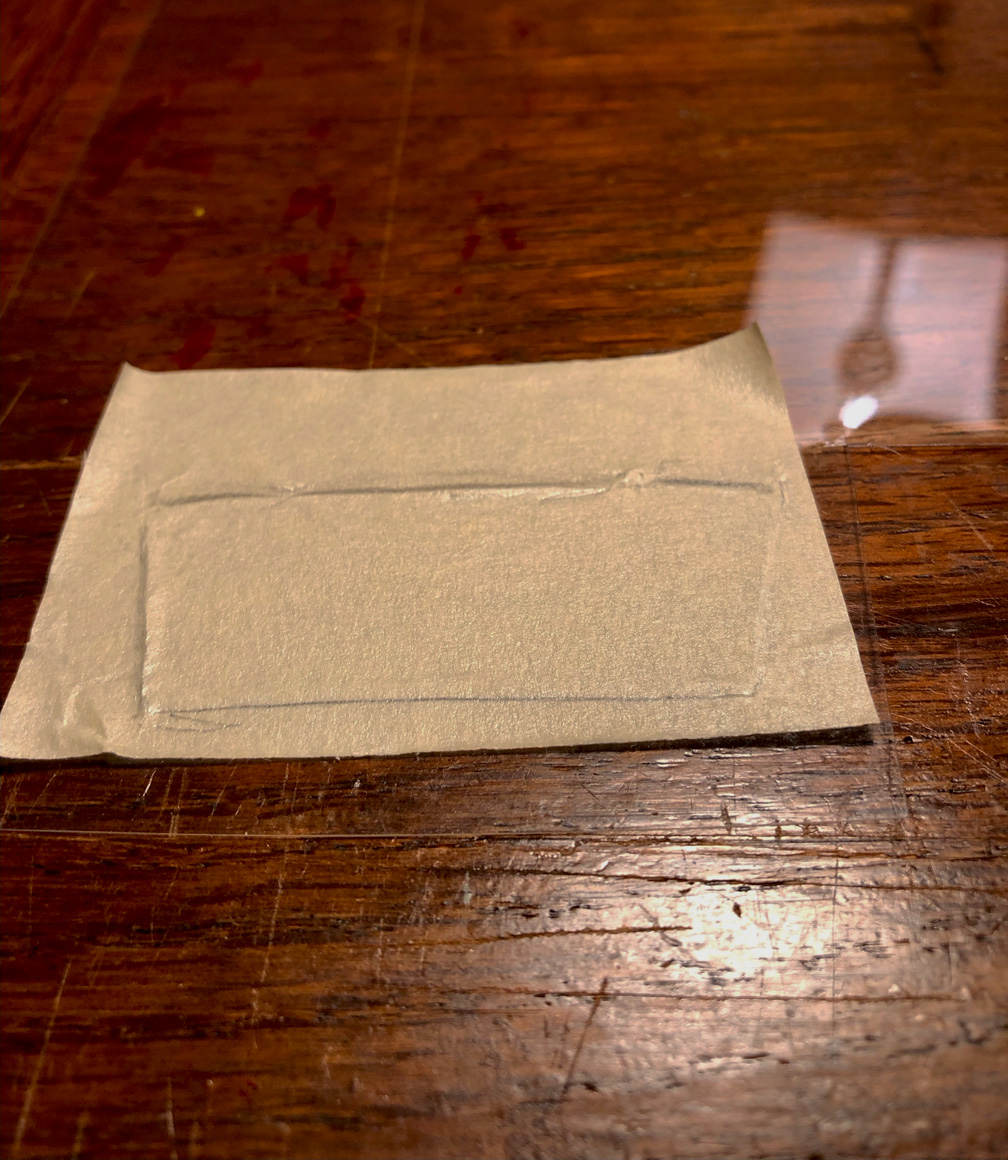

Photo 1. Shown here is the kit glass. Notice how all the sides show distortion from the glass being so thick and
how wavy and distorted the entire finish is. This looks awful and is unacceptable to me.
Photo 2. (Standard Installation) Place masking tape on inside of window.
Use a pencil to trace the outline on masking tape of where the new glass will be glued to.
Put traced masking tape on a sheet of 0.10" clear plastic and cut along pencil line. (see photo 4).
Photo 3. (Flush Fit) I didn't care for the look of the glass from the "standard installation" as
it made the glass look too far from the window trim (a design flaw in the kit's windshield to body design).
I'll be using this"flush fit" method for my Hairy Olds build.
Photo 4. Put traced masking tape on a sheet of 0.10" clear plastic and cut along pencil line.
Photo 5. Notice there's no optical distortion as there is with kit glass.
![]()